The Andaman and Nicobar Islands – one of the seven union territories of India, are a group of islands at the juncture of the Bay of Bengal and Andaman Sea. Its also one of the major bird watching destinations in India, with around 270 bird species out of which few are endemic to the region.
Tour Itinerary
Day 1: Arrival & Birding at Sippighat Wetlands.
Day 2: Morning Session at Shoal Bay; Evening Session at Garacharma Wetlands.
Day 3: Full Day Birding at Chidiyatapu.
Day 4: Birding at Ograbranj Wetlands.
Day 5: Birding at Mt. Harriet National Park.
Day 6: Departure.
[rule style=”rule-fadecorder” ]
Photography tour for small group or personalized tour can also be arrange. Please email us for cost and more details.
[rule style=”rule-fadecorder” ]
Note that this is a sample itinerary and can be customized as per your requirements. Please use the form below to let us know about your requirements and we shall get back to you with an updated itinerary along with a tentative cost.
[rule style=”rule-fadecorder” ]
Enquiry about this tour
Please include complete details and contact information. In case of any special requirement please include the same in other details section.
Day 1: Leh Airport to Leh Town (4 Km | 15 minutes approx.). Arrival at Leh airport and transferred to the Hotel. Complete day for acclimatization. O/N Leh.
Day 2: Leh Local (100 Kms| 4-5 hrs approx.). After breakfast proceeds to visit Thiksey & Stok Palace Museum and bird watching near Indus river. O/N Leh.
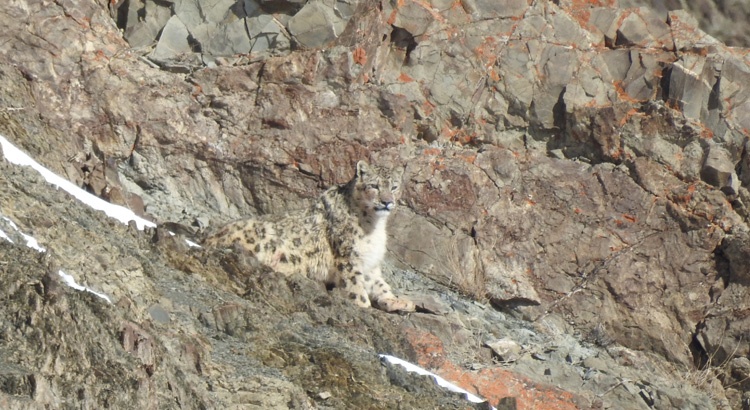
Day 3: Leh to Zingchen to Rumbak 5 hrs. After having the breakfast drive to Zingchen and start walking through Zingchen Gorge. As we continue trekking further, the gorge gets narrower and rugged. On the way, one might see snow leopard signs along the valley bottom of the side valleys if you are trekking during winter or early spring/fall. As you approach Rumbak fields the valley suddenly opens up with snowcapped mountains in the background. From the fields, the path turns left eastwards for the Rumbak village, where Homestay is available. O/N Homestay.
Day 4 to Day 8: Wildlife viewing. After the breakfast proceed for full day wildlife viewing along with a trained local guide. Wildlife viewing possibilities are Blue sheep, the Great Tibetan sheep or the Argali, and occasionally a Tibetan Wolf and a Snow leopard. Overnight in Home Stay.
Day 8: Rumbak to Ule. After breakfast drive to Ule village where we have another chance to see a snow leopard. Overnight at Ule Homestay.
Day 9: Ule to Leh. After Lunch drives back to Leh on we visit Pathar Sahib Gurudwara, Magnetic hill and Sangam (Confluence of Zanskar & Indus Rivers). O/N Leh.
Day 10: Leh to Leh Airport. Early morning transfer to Leh airport to board the flight back to the destination.
Picture credit: Tsewang Gyaltsan
[rule style=”rule-fadecorder” ]
Note that this is a sample itinerary and can be customized as per your requirements. Please use the form below to let us know about your requirements and we shall get back to you with an updated itinerary along with a tentative cost.
[rule style=”rule-fadecorder” ]
Enquiry about this tour
Please include complete details and contact information. In case of any special requirement please include the same in other details section.
Bird photography, especially wild bird photography can be quite challenging. There are many articles on the Internet that cover everything from “bird photography tips” to “the art of bird photography”, but I found that many of them are not detailed enough and do not contain as much information for an amateur bird photographer. After several years of photographing birds, I decided to write this “How to photograph birds” guide and include everything I know about taking good pictures of birds. Since most of the bird photography nowadays is done on digital, the instructions below would work great for digital cameras. If you are still shooting film, just skip the parts that do not apply to film (such as RAW format, etc). Parts of this article also apply to birding or bird watching, so if you like birds and just want to be able to approach and watch them closely, read the Locating Birds and Approaching Birds sections only.
Note: This guide will work for any DSLR camera, but since I am a Nikonian, I will only cover settings for Nikon DSLRs and provide detailed information on Nikon lenses that are best for bird photography. This guide could be used for any type of wildlife photography, but I will be concentrating on fast-moving birds and birds in flight, so if you are taking a picture of a fast-moving animal, feel free to use the same camera settings.
How to photograph birds or
A photographer’s step-by-step guide to bird photography
NIKON D300 @ 200mm, ISO 200, 1/250, f/5.0
1) First things first – Your camera equipment
Unfortunately, camera gear is the most important part of wild bird photography. Forget about taking pictures of birds with a point and shoot or a DSLR with a wide angle lens, unless you are standing close and photographing ducks and geese that are not afraid of people. If you want to shoot wild birds, prepare yourself to invest in a fast DSLR camera and one or more telephoto lenses.
So, what DSLR is good for fast-action photography? I would recommend a fast camera that can handle at least 1/2000 of a second shutter speed with 6 to 9 fps (frames per second), if you want to get the best results, plus a good autofocus system for quick focus acquisition. Any modern DSLR is capable of shooting at 1/2000 of a second and faster. Fast frames per second and good autofocus mean professional cameras such as the Nikon D300/D700/D3 or Canon 50D/1D/1Ds that are suited best for fast-action and wildlife photography. But if you already have an entry-level DSLR, it doesn’t mean that you cannot capture birds – it just means that you might miss a good shot, just because your camera is not fast enough. The most important thing to keep in mind – the speed of focus acquisition both on camera and on lenses are far more important than DSLR’s frames per second.
NIKON D300 @ 370mm, ISO 450, 1/250, f/8.0
Which brings us to the next question: What lenses are good for bird photography?
It is tough to answer this question, because it all depends on how much money you are willing to put into a lens. The best bird photographers in the world will tell you that they cannot live without their 500mm and 600mm lenses, preferably with optical stabilization + teleconverters. The Nikon 500mm f/4 VR currently sells for approximately $8,500 USD, while the 600mm f/4 VR is about $10,300 USD. That’s very pricey and only professionals who make money by selling their images and people with large wallets can buy those lenses. If you are one of those, the best combination for bird photography would be Nikon D3s + 600mm f/4 VR + 1.4/1.7 TC (TeleConverter), which will altogether cost you about $15K and give you the best performance and reach. In addition, you will have to buy a good heavy duty tripod + accessories (batteries, memory cards, etc), which will cost another $2-$3K. The “not-so-bulky” and somewhat hand-holdable Nikon 300mm f/2.8 + 1.4x/1.7x TC or Nikon 200-400mm f/4.0 + 1.4x TC will also yield excellent results and run at about $5-6K USD, but at the cost of the extra reach. On the Canon professional side, the choice is similar to Nikon’s, except for the excellent Canon 800mm f/5.6L IS (Image Stabilization), which is actually lighter than the 600mm f/4.0L IS and gives more reach. On the flip side, Canon also does not have anything similar to the versatile Nikon 200-400mm f/4.0.
NIKON D300 @ 400mm, ISO 200, 1/1600, f/4.0
For everyone else on tight budgets, the choice is limited to shorter focal lengths, plus teleconverters. As of today, the best affordable Nikon lenses for bird photography are either the 300mm f/4.0 AF-S or the 80-400mm f/4.5-5.6D VR. I tried both the 300mm f/4.0 AF-S and the 80-400mm f/4.5-5.6D and ended up getting the 300mm f/4.0 AF-S with a teleconverter. Equipped with a fast AF-S autofocus system, the Nikon 300mm f/4.0 + 1.4x TC is essentially a 420mm f/5.6 lens that produces very sharp and crisp images with a pleasing background blur (bokeh). The only big negative on the Nikon 300mm f/4.0 is lack of VR, which I hope Nikon will add into the future versions of this excellent lens. I have tried the 300mm f/4.0 with a 1.7x teleconverter, but was not impressed with the results. Although autofocus still works, the camera starts to haunt, trying and failing to acquire accurate focus. At 510mm f/7.1, you would need good stabilization and plenty of light to have acceptable images. Just remember that whenever you go beyond f/5.6 on a lens with a teleconverter, Nikon will not guarantee autofocus to work. In fact, if you read the Nikon lens manuals, they state that autofocus does not function beyond f/5.6 period, although as I said earlier, it does work, but not very well. I have also tried the Nikon 70-200mm f/2.8 VR II + 1.4x/1.7x TC and I can tell you that the 300mm f/4.0 beats this combo hands down in terms of IQ, focal length, sharpness and bokeh. If you are a Canon shooter, the best bird photography lenses are the Canon 300mm f/4.0 IS + 1.4x TC, the Canon 400mm f/5.6L (but no IS) or the Canon 100-400mm f/4.5-5.6L IS. Some birders report good results with the Sigma “Bigma” (Sigma 50-500mm f/4.0-6.3), but I have not tried this lens and therefore cannot compare it with others.
NIKON D300 @ 400mm, ISO 280, 1/250, f/5.0
So far, everything that I have mentioned above in terms of focal length was for lenses alone. Once mounted on a DSLR body, the camera sensor type will also impact the field of view, meaning what you actually see in the frame and in the image. Compared to full-frame sensors, crop factor sensors will generally provide a better reach, due to the smaller size of the sensor. If this sounds confusing, see my DX and FX and Equivalent Focal Length and Field of View articles. All Nikon DX sensors have a crop factor of 1.5x, while Canons are 1.6x. So, the actual field of view, which some photographers call “equivalent focal length” (meaning equivalent compared to 35mm film/full-frame) can be approximately calculated by multiplying this crop factor by the total focal length of the lens + teleconverter. For example, the Nikon 300mm f/4.0 lens with a 1.4x teleconverter (420mm total) mounted on a DX camera would have an equivalent field of view as a 630mm (420mm x 1.5) lens on a full-frame (FX) sensor. Meaning, if you were photographing a bird from say 10 feet away and you could fill your frame with the bird using a Nikon 300mm f/4 lens with a 1.4x teleconverter on a DX camera, you would need a 630mm lens if you were shooting a 35mm film or FX camera to fill the frame the same way.
Being able to reach birds from a distance without distracting them is a major part of bird photography and this combination of a long telephoto lens with a DX sensor camera definitely provide more opportunities for successful birding. The downside of a crop-factor sensor, however, is the amount of noise on images at high ISO levels – so better reach does not necessarily mean better quality. As I have pointed out in my DX vs FX article, full-frame sensors control noise much better than crop-factor sensors, especially in challenging light. So both have advantages and disadvantages – DX gives you better reach, while FX gives you better quality. I prefer the latter, but I know many bird photographers prefer better reach instead. Keeping a fast shutter speed and retaining low ISO requires lots of light, especially on a lens combination with a maximum aperture of f/5.6. Therefore, in low-light situations, I would recommend to shoot on a tripod at slower shutter speeds rather than cranking up the ISO and having images with less detail. Birding is all about retaining the detail and having sharp images – nobody likes bird pictures that are soft or out of focus. The maximum ISO I typically use on my DX body is 800, while using 1600 and sometimes even 3200 on a full-frame FX body, which produce images with enough detail for my bird photography needs. Noise can be dealt with during post-processing, but lost detail cannot never be recovered.
What about tripods? If you use heavy 500mm or 600mm lenses, a good tripod system (a tripod and a tripod head) is a must, simply because hand-holding these lenses is not practical. The best tripods are made by a company called “Gitzo” and they manufacture carbon-fiber tripods that are extremely stable and lightweight. The best and the most expensive heavy-duty tripod heads for bird photography are “Gimbal” type heads by Wimberley or Kirk Enterprises with Arca-swiss quick-release systems. They handle heavy lenses very well and provide enough flexibility to shoot birds in flight. If you are looking for something more affordable, check out some of the cheaper Gitzo or Bogen tripods and RRS or Kirk ballheads. I prefer the Arca-swiss quick-release systems because they provide the most stability and are very easy to use. I do not recommend mounting lighter lenses on a tripod for bird photography, unless, you are standing in one spot and shooting a particular area or, as I’ve said above, there is not enough light to shoot hand-held.
2) Camera settings
Maintaining fast shutter speeds, especially for birds in flight and small birds that move very quickly is extremely important – you cannot fix motion blur in post production. In some cases, photographers shoot at slightly slower shutter speeds just to get the bird’s wings slightly blurred, to create a feeling of motion. But in all other cases, you want to freeze the bird completely, to fully freeze the action. To achieve this, I typically set my shutter speed to a minimum of 1/800-1/1600. Most digital SLR cameras have the following camera modes: “Manual“, “Shutter Priority“, “Aperture Priority” and “Program“. The camera mode I use the most for my photography, including birding is “Aperture Priority”. Many cameras today come with Auto ISO feature that automatically adjusts the ISO based on light conditions. You can set a minimum shutter speed, which can be set to a high number for bird photography and maximum ISO to retain the detail. This feature is very useful and I use it all the time, setting the Auto-ISO to on, maximum ISO to 800 on DX sensor and 1600 on FX sensor and minimum shutter speed to 1/800 of a second. The latest generation of Canon DSLRs also have the Auto-ISO capability, but it is not as versatile as Nikon’s. When shooting in “Aperture Priority” mode, which I use the most, I set the Auto-ISO minimum shutter speed to 1/800 and shoot wide open, i.e. with a maximum aperture. The nice thing about shooting in “Aperture Priority” mode, is that if there is too much light, my shutter speed increases to a bigger number and if the light deteriorates, the camera’s Auto-ISO feature increases the ISO and tries to keep the shutter speed at whatever I set it to. If the highest ISO is already reached and there is still not enough light, it will obviously decrease the shutter speed, while still keeping the exposure consistent. Another reason for using “Aperture Priority”, is a quick ability to change the aperture of the lens to capture a bigger area and control bokeh. For example, if I’m shooting wide open at f/4.0 and standing close to a bird, my depth of field is very shallow and if I focus on the eye of the bird, I might not be able to capture its back or tail in full sharpness. By increasing the lens aperture to a higher value, I can increase the depth of field and capture the bird in full detail. I personally do not find “Shutter Priority” useful for bird photography, because I do not want my camera to set the aperture for me. Because I will be shooting at high shutter speeds, most likely the aperture will be always set to wide open, so I do not see the point of shooting in this mode. Worst of all, if the light conditions change instantly (let’s say the bird moved from an open area to a shadowy branch of a tree), since the camera is set to “Shutter Priority” and therefore will always shoot at the predefined shutter speed, the image might come out underexposed, even with the Auto-ISO turned on.
What about shooting hand-held? If you have a very high shutter speed, shooting hand-held should not be a problem. However, sometimes the lighting conditions are very poor and you cannot use fast shutter speeds. Once your shutter speed drops to a certain threshold, you will start getting blurry images. How do you avoid that? The general formula is to keep the shutter speed to at least the total focal length of the lens. So if you are shooting with a 300mm lens, your shutter speed should be at least 1/300 of a second on a 35mm film/full-frame body. If the 300mm lens is mounted on a crop-factor sensor, the shutter speed should be at least lens focal length multiplied by the crop factor – 1/450 of a second in this case.
NIKON D300 @ 380mm, ISO 800, 1/250, f/4.0
So here are my Nikon camera settings for bird photography:
Camera mode: Aperture Priority with aperture set to maximum aperture (wide open).
Metering: “Spot Metering” (a single dot).
Auto-focus: High Speed Continuous Mode (set to “C” in front of the camera and to “Ch” on the camera dial), AF Area Mode Selector set to the middle selection (cross-hair).
Shooting Menu:
Image Quality: RAW, 12-bit on Nikon D300 and 14-bit on Nikon D700
NEF (RAW) recording: Type: Lossless compressed, NEF (RAW) bit depth: 12-bit on D300, 14-bit on D700/D3
White Balance: Auto
Active D-Lighting: Off
Vignette Control: Normal
High ISO NR: Normal
ISO Sensitivity: 200, ISO sensitivity auto control: On, Maximum sensitivity: 800 (DX) or 1600 (FX), Minimum shutter speed: 1/800
Custom Setting Menu:
AF-C priority selection: Release + focus
AF-S priority selection: Focus
Dynamic AF area: 51 points
Focus tracking with lock-on: Short
AF activation: Shutter/AF-ON
AF point selection: 51 points
ISO sensitivity step value: 1/3
EV steps for exposure cntrl.: 1/3
Exp comp/fine tune: 1/3
Beep: Off
Viewfinder grid display: On
Multi selector center button: Shooting mode: Reset (Select center focus point), Playback mode: Zoom on/off, Medium magnification
The items I highlighted in red are the ones that are important for me. I always shoot images in RAW, because it is nearly impossible to recover enough detail and colors from JPEG images. Plus, you do not have to worry about color balance, color space and many other things if you shoot in RAW. Some people might argue that shooting RAW is a waste of space and is too complicated, but space is not a problem nowadays as you can buy terabytes of hard drive space (which will last you a very long time) at several hundred dollars. The only issue with shooting RAW is that your camera buffer could quickly fill up, causing your frame rate to drop to only 1-2 frames per second or below. I recommend shooting with fast CompactFlash and SD cards, so that the memory does not become the bottleneck. By the way, some professional cameras like Nikon D3s can be upgraded to have more internal buffer memory. Once upgraded, it would be almost impossible to fill up the buffer, even while shooting RAW.
NIKON D300 @ 550mm, ISO 200, 1/1000, f/5.6
3) Locating birds
Now that you have your equipment set up, you need to find birds to photograph. I recommend starting with the most common birds such as finches, sparrows and robins that are used to people and do not mind cooperating with and posing for photographers. Try to develop some skills and techniques by photographing them sitting on benches, eating, sleeping and flying. The best time for photography is either during the early morning or late afternoons and the same thing applies for birds. Early morning is typically the best for bird photography, because birds actively look for food for themselves and their youngsters. So try to go out and shoot some local birds and see what you can do. Review your images after the photo shoot and see what you don’t like about your pictures. Whether you have a sharpness problem or focus issues, the best way to improve your bird photography is to practice more.
NIKON D300 @ 400mm, ISO 400, 1/500, f/4.0
Once you are done with practicing, go for a real photo shoot. Some of the best opportunities for bird photography might be very close to you. Start off by just Googling for “best birding in your_state” or “top birding locations in your_state”. For example, if I Google for “best birding in Colorado”, plenty of different links come up that point to good birding locations, some only several miles away from where I live. Many of the links will also contain detailed information on different bird species, their habitat, migration patterns and a lot more. Another great source of information on birds is to contact your local bird-watching clubs and groups. Some might even have mailing lists for sharing information on rare sightings of birds. Thanks to the big number of bird watchers, there are plenty of other online resources, books, magazines, newspapers and much more, and locating birds is not hard at all. What is hard, is locating rare and exotic birds and photographing them, especially if they are very shy.
If you have a hard time locating birds or want to photograph birds from a close distance, a local zoo or a bird sanctuary might be excellent opportunities for bird close-ups. The National Audubon Society, for example, organizes various bird-watching activities and tours that you can sign up for. There are plenty of other organizations that look for all kinds of volunteers and sometimes even volunteer photographers.
NIKON D700 @ 420mm, ISO 800, 1/1000, f/5.6
4) Approaching birds
What do you do if the bird you are trying to approach gets scared and flies away? There are many different techniques to approach wild birds and I will go through what works for me. Pretty much all birds have superb vision, so it is very likely that the bird will see you first. Also, all birds have their own “comfort zones” and if you try to get any closer, they feel threatened and fly away. Different birds have different tolerance levels for human interaction. Some birds will let people pretty close, especially if they are used to them – those birds are the easiest to photograph. And then there are birds that are extremely shy, that will not let you come anywhere close. Those birds are extremely hard to photograph and you will have to understand the bird behavior to get closer. The key to successful bird photography, is to make the bird feel safe and natural. Some skilled birders can approach birds very closely, sometimes way beyond their comfort zones. How do they do it? Most of them will respond that it is all about patience. Birds feel threatened when you approach them too fast directly. They also feel threatened when you look directly at them, as any other animal would.
NIKON D700 @ 300mm, ISO 1600, 1/1250, f/5.6
So, here is my technique to approach shy birds:
Do NOT wear clothes with bright colors and try to blend in with the environment as much as possible. Although some photographers prefer wearing camouflage, I personally wear gray or light blue shirts with blue jeans, which work great.
If you are hiking and have been walking fast and all of a sudden you spot a bird that you want to photograph, slow down. Don’t change your walking speed right away – slow down marginally, so that the bird does not detect sudden changes in your behavior.
Do NOT make sudden moves. If you need to raise your camera and take a picture, do it very slowly.
Turn off your cell phone or put it on silent mode. It really sucks when you are close to a bird and your phone starts ringing…
Once you see a bird, do NOT walk straight towards the bird, but rather walk slowly in zigzags. Sometimes walking in zig-zags is not very practical, especially if you have already scared the bird by your presence. The key is to walk slowly (sometimes 1-2 feet per minute or slower), no matter how you are approaching the bird. Also, instead of walking from heel to toe, try the other way around, keeping your weight on your back foot as you walk.
Try not to walk if the bird is looking at you. The best time to approach is when the bird is looking away or is busy doing something.
Keep your noise to a minimum. Noise is hard to control if you are walking through bushes or if you have to step on fall leaves that create a cracking sound, so watch what you are stepping on and do it very slowly to diminish the noise.
See if the bird is already scared – if it is staring at you and stopped doing whatever it was doing before, it means that the bird is on alert and might fly away any time. You can also tell if the bird is scared if the bird is raising its tail and pooping (especially raptors).
Do NOT stare at the bird while approaching it. Animals in general perceive direct eye contact as a threat and they will flee at their first opportunity.
Your camera shutter will most likely scare the bird you are approaching. Therefore, I recommend shooting the bird as you approach from the distance, so that the bird gets used to the shutter clicking noise.
In some cases you might be lucky enough to meet a “YASJ” (young and stupid juvenile). Juvenile birds are typically very curious and will let you approach them very closely. Even if juvenile birds allow you to come very close, still try to keep your distance. If you are able to fill the viewfinder with the bird, you are already too close. Moreover, standing too close to a bird is also problematic, because only a part of the bird will be sharp, due to a shallow depth of field, so you will then have to close down your aperture, which also means losing shutter speed.
NIKON D700 @ 420mm, ISO 250, 1/2000, f/5.6
5) Photographing birds
Photographing birds and making beautiful pictures requires good knowledge of your photography equipment. For birds in flight, high shutter speeds are required or the bird will look blurry. I find that a minimum shutter speed of 1/800-1/1600 for birds in flight works great for me, but in some cases slightly lower shutter speeds are also OK, depending on the size of the bird and how fast it is flapping its wings. For example, to freeze this hummingbird in flight, I used a shutter speed of 1/1600 and even then, the wings look slightly blurred, just because the bird flaps wings faster than my shutter speed.
NIKON D700 @ 300mm, ISO 800, 1/1600, f/5.0
Bokeh is another key factor to successful bird photography. In most cases, it will be hard to control the bokeh simply because the bird will not let you walk around and plan your shot, but there are a few things you can do to achieve great bokeh. Make sure that there is a good distance between the bird and the objects behind it. The greater the distance, the better the background blur (although it is more complex than that, because the distance between you and the bird and your lens focal length/lens optics all play roles in the quality of bokeh). Some photographers set up clear benches near bird hot spots or at their houses, which works great because they can set up feeders and take clear pictures of birds with a controllable background. You can find similar opportunities with bird feeders at a nearby park. Also, shooting birds in winter (depending on your climate) generally yields better results simply because tree branches are clear and birds cannot hide behind leaves. For shorebirds and other water birds that do not sit on branches, the best way to achieve great bokeh is by laying on the ground/sand when the bird is out of the water.
NIKON D300 @ 280mm, ISO 800, 1/250, f/6.3NIKON D300 @ 420mm, ISO 200, 1/250, f/6.3
Here is how I recommend to photograph birds:
Shoot at high shutter speeds of 1/800 and above to freeze the bird. For birds in flight and fast-action scenes, use shutter speeds above 1/1600. For birds that are just sitting on benches and not being active, you can use slower shutter speeds of 1/250-1/800 and lower ISO for better image quality (a tripod or a monopod for slower shutter speeds is highly recommended).
Always focus on the nearest (to the viewer) eye of the bird. It is acceptable to have a blurred tail or other parts of the bird, but at least one eye always needs to be in focus and sharp. For birds in flight, focus on the bird’s head or chest – whichever provides better contrast for the camera autofocus system.
Choose your background carefully to achieve a smooth bokeh. Pictures with objects behind the bird are not as pleasant as pictures with a smooth background.
Be patient and wait for the bird to act naturally. Images with a bird sitting on a bench are boring, so try to capture interesting action instead.
Use a blind whenever possible. One of the best blinds is your car and you could get pretty close to a bird without scaring it with your vehicle. Birds are generally not scared of cars and you could drive up fairly closely and take some amazing shots. I have taken many beautiful shots of birds directly from my car, without getting out of it. Hunting blinds also work very well if you find the right spot such as a pond or a feeder.
Having a camera flash extender such as the “Better Beamer” is very helpful for fill flash, especially to photograph birds under tree leaves or in darker areas.
Shoot lots of images. I typically shoot a single image first, then take a look and make sure that the images are sharp and in focus. If everything looks good, I will shoot the bird in bursts of 5-10 frames at a time. Having a fast camera that can handle 5-6 frames per second is very helpful. I then go through hundreds or sometimes even thousand of pictures at home and delete the images that I do not want.
Try to position yourself with your back towards the sun. Sometimes having the sun to the far left or right is OK, but having it behind you will give you the best light.
Shoot either early in the morning or closer to the evening. You will find that early morning or later afternoon provides the best opportunities, because the birds are hungry and are looking for food. I personally prefer to shoot early in the morning – that’s when the birds are most active.
Try not to take pictures of birds in flight during a cloudy day. Photographs of birds with white or gray backgrounds don’t look as good and are hard to deal with during post-processing.
NIKON D700 @ 45mm, ISO 560, 1/250, f/4.0
6) Post-processing and cropping
I use Adobe Lightroom and Photoshop to store and process all of my photographs. Lightroom is a great and easy tool to organize your images and catalog your bird collection, while Photoshop is great for fixing images that cannot be fixed within Lightroom. I probably spend 90-95% of my time in Lightroom and about 5-10% in Photoshop. I shoot everything in RAW (and I recommend you do, too), so I can achieve much better results while manipulating images in Lightroom or Photoshop, since I have a wide spectrum of colors that I can work with and maximum image quality.
Cropping is a big part of bird photography. Unlike people, birds do not sit and pose in front of the camera, so filling the frame with the bird is not always possible. If you photograph a bird from a distance and try to resize the image to a smaller resolution for the web, the bird will look too tiny. You wouldn’t be posting the high resolution image either, because at 10-15 megapixels, the image will not fit into any standard monitor screen. Cropping helps photographers bring birds closer to the viewers and highlight them, rather than distracting the view with unwanted objects. So, how much should you crop? It depends on how much space the bird takes in your photograph. If it is almost filling the frame and you just need to get rid of some unwanted objects, cropping works like a charm; you could also make large prints at that resolution. However, if the bird is only taking up 5-10% of the frame, cropping will work for the web, but not for large print, so keep that in mind.
Good luck and have a fun time photographing birds!
The most useful binoculars for bird watching incorporate a few basic features. They have a central focus wheel and a diopter focus adjustment. The diopter is often part of the right-hand eyepiece on a binocular. The purpose of the diopter is to compensate for the differences between your two eyes (because no two eyes are the same or have the same ability to focus.) Adjusting both the diopter focus and the central focus is how you get the clearest possible image from your binocular.
Tip: Always use your binocular’s neck strap. Carrying your optics around in your hand by the strap is asking for trouble. The strap keeps the binoculars safe around your neck and against your chest, within easy reach of your hands. Some birders prefer to use a binocular harness, which uses straps over the shoulders and across the back to distribute the weight of the binoculars.
Warning: If your binocular does not have a diopter or if it lacks a central focus wheel (some models make you focus each eyepiece individually), these are not good optics for birding. Consider replacing them with a pair more suited for bird watching.
Focusing
Start by adjusting the distance between the two barrels of the binocular so that they are the right width for your eyes. Too far apart or too close together and you will see black edges in your field of view. If you have the spacing right, your view will be a perfect circle.
Next, find something to focus on, such as a dark tree branch against the blue sky, a street sign, or an overhead wire. Focus with both eyes open by turning the central focus wheel.
Now it’s time for the fine focusing. Close your right eye and, using only your left eye, adjust the focus wheel. Next, close your left eye and, using the diopter adjustment, bring your view into sharp focus.
Now open both eyes and see if your focus is crystal clear. If the image is not clearly focused, repeat these steps, making small adjustments using one focus wheel or the other.
How can you tell if your focus is correct? First of all, the view through your binoculars, with the diopter adjusted, should appear almost three-dimensional. It should really pop out at you and be crystal clear. Also, your eyes should not have to work hard when using your binoculars.
Note: If you feel a slight strain in your eyes, or if using your optics gives you a headache, there might be a problem with your binoculars. They could be out of alignment. Most binocular manufacturers are happy to service their optics. If you think your binocs have a problem, contact the manufacturer and ask about getting your optics serviced.
Finding the Bird
The one problem birders typically encounter more than any other is getting their binocs pointed right at the bird. This can be a problem even when the bird is sitting still, perched in an obvious place. Fortunately, this problem can be easily overcome with a bit of practice. Here’s how:
Looking with your naked eyes, find a bright leaf in a distant tree, or a certain spot on a distant building, and lock you eyes onto it. Now, without removing your eyes from that spot, bring your binoculars up to your eyes and into alignment with your view. Did it work?
With practice you’ll find that locking your eyes in place and bringing the binocs into alignment really works. This will make it easier for you to find birds with your binocs, even if a bird is moving.
Tip: When locking your eyes onto a distant bird, note some other feature or landmark near the bird’s location. This can be a notch in a tree’s outline, a brightly colored leaf, or even a passing cloud. Note where the bird is in relation to this landmark and it gives you another reference point to use when your binoculars swing into place.
Cleaning Your Binoculars
No matter if your binoculars cost $100 or $1,000, they will need to be cleaned regularly. And cleaning them the wrong way can really damage them. Wiping your shirtsleeve across your lenses may seem like the easiest way to get the dust off, but you might be putting lots of tiny scratches on the glass or lens coatings. Over time these tiny scratches will reduce the clarity of the image your binocs can produce.
The best way to clean precious optics lenses is:
Use a soft brush or compressed air to blow away particles (dust, dirt, grit, crumbs, etc).
Once the particles are removed, wet a lens cloth or lens tissue with cleaning solution (solution made for use on coated lenses, available at camera shops and outdoor stores).
Softly wipe the lenses with the wet cloth.
Dry the lenses with a dry portion of the lens cloth.
Hold the binocs up in the light and look for smudges or smears. Repeat the wet cleaning as needed.
Protecting Your Binoculars
On a recent birding trip to Guyana, BWD editor Bill Thompson, III, had the opportunity to field test the BinoBib, manufactured by Devtron (scopecoat.com). The BinoBib is like a wetsuit for your binoculars, encasing them in a layer of soft Neoprene. The bib features a tube of material in the middle that slips onto the barrel. A large, preformed piece of additional material stretches over the eyepieces and down around the objective lens end of your optics, fitting snugly and providing total protection.
Eagles are large birds of prey which are members of the bird family Accipitridae and belong to several genera which are not necessarily closely related to each other. Most of the more than 60 species occur in Eurasia and Africa. Outside this area, just two species can be found in the United States and Canada, nine more in Central and South America, and three in Australia. Below is listed all the members of the eagle family.
As their name suggests, sea eagles, and the closely-related fish eagles, live near water bodies and exist on a diet largely comprised of fish. This widespread and varied family of eagles can be found on every continent except South America and Antarctica, the most famous of which being the Bald Eagle, the national bird of the USA.
A group of medium-sized raptors who are specialised to hunt snakes and other small reptiles. these Old World eagles are found in tropical parts of Asia and Africa.
eBird is a real-time, online checklist program that the birding community reports and accesses information about birds. Launched in 2002 by the Cornell Lab of Ornithology and National Audubon Society, eBird provides rich data sources for basic information on bird abundance and distribution at a variety of spatial and temporal scales.
The observations of each participant join those of others in an international network of eBird users. eBird then shares these observations with a global community of educators, land managers, ornithologists, and conservation biologists which in times to come will become the foundation for a better understanding of bird distribution across the world.
Oh we missed the best part..! By keeping track of your bird observations and entering them into the eBird database, you’ll benefit, too. You can access your own bird records anytime you want, allowing you an easy way to look at your observations in new ways and to answer your personal questions about what birds you saw and when and where you saw them.
In my last article I looked at the fundamental reason why your camera’s meter sometimes gets exposure wrong. Camera meters measure reflected light, and will give an incorrect exposure reading if the subject is lighter or darker than average (you can read the article again for a full recap).
But there’s another reason why your camera’s meter may get the exposure wrong – and it’s to do with the metering modes that your camera has. Most cameras have several exposure modes (my Canon camera has four). Each exposure mode is designed with for a different purpose, and works a specific way. If you are struggling with exposure, it may be because you don’t fully understand the way the metering mode that you are using works.
Most digital SLRs have the following exposure modes:
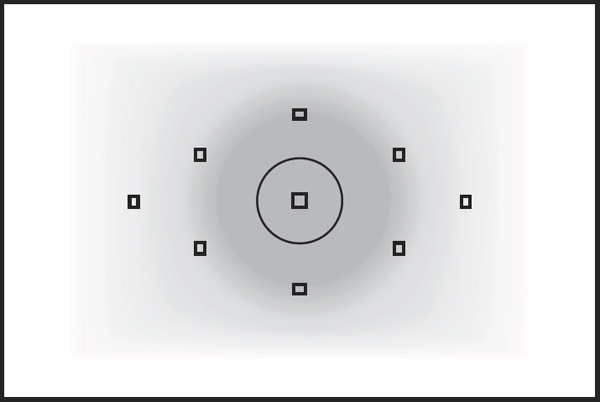
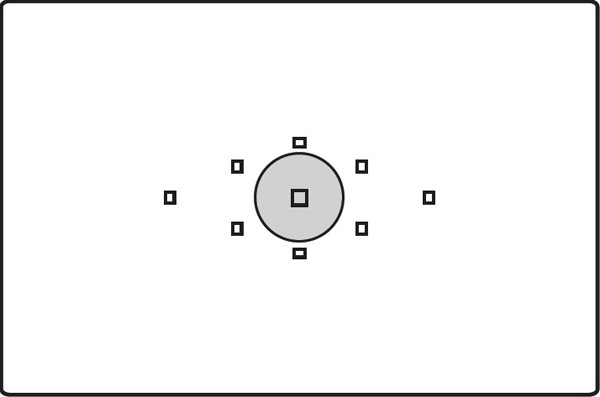
Centre-Weighted Metering
This mode weights exposure towards the centre of the viewfinder, as per the diagram above.
Centre-weighted metering works well if your subject is in the centre of the frame. If not, you have to point the centre of the viewfinder at your subject, hold the shutter button half-way down to lock in the exposure, then reframe.
Centre-weighted metering has been around a long time – if you own an old film camera it may be the only metering mode that it has. It’s predictable and easy to use once you understand that the camera is metering from the centre of the viewfinder.
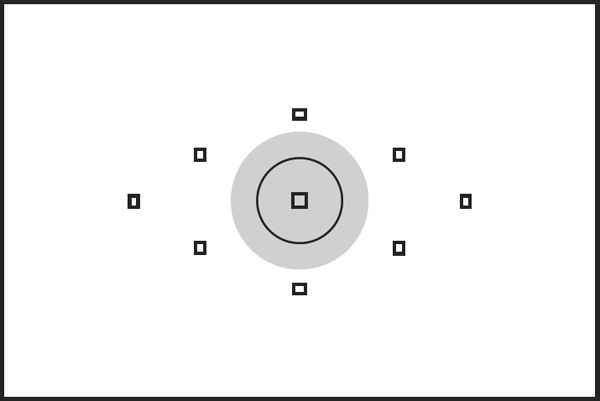
Spot Metering
The camera takes an exposure reading from a circle in the centre of your viewfinder. The diagram above shows the spot metering circle in the viewfinder of the EOS 5D Mark II.
Spot metering takes practise. Remember in the last lesson we learnt that cameras measure reflected light, and that the camera is expecting the tones within the area that it meters to average out to mid-grey? If you point the spot metering circle at a tone that is lighter or darker than mid-grey, the camera will give you an incorrect exposure reading.
One way to use the camera’s spot meter is to point it at something in the scene that is mid-grey in tone. Grass is a good example, and one approach to metering is to simply use the spot meter and take a reading off any grass or greenery in the scene.
Another technique is to use an 18% grey card (you can buy these from photo retailers). I’ve seen these used by portrait photographers. They ask the subject to hold the card up, take a reading from the card, then put it away, set the camera to manual mode and use those settings. They only need to re-meter if the light changes.
Another situation where spot metering comes in handy is when you have a bright subject against a dark background. This can happen during a theatre performance or a concert. You can take a reading from the subject and the camera will ignore the background.
Partial metering
Works just like spot metering but with a larger circle. Like spot metering, it works well for metering brightly lit subjects against dark backgrounds. You can use partial metering for taking a reading from a larger part of the subject than the spot meter.
Evaluative Metering
Note: Evaluative metering is Canon’s term and the one that I’ll use in this article. Nikon uses matrix metering and Pentax and Sony use multi-segment metering.
Centre-weighted, spot and partial metering all take an exposure reading from the centre of the frame. Given that most photographers prefer to place the main subject off-centre for compositional reasons, this means that taking an exposure reading with one of these modes is not always the easiest way to work.
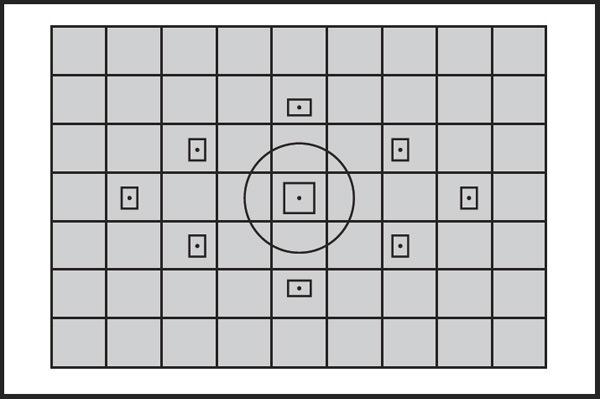
Evaluative metering was developed by the camera manufacturers to make it easier to measure exposure with off-centre subjects. The camera divides the viewfinder up into zones and compares exposure readings from each zone to come up with a suggested exposure setting. The above diagram shows the way the viewfinder is divided up into 63 zones on some EOS cameras.
The camera weights the exposure reading towards the active autofocus point (or points) as they are likely to be covering the main subject. It takes into account the readings from nearby zones and analyses the contrast of the scene to come up with an exposure setting.
Each camera manufacturer uses a slightly different process in their evaluative metering modes. While the manufacturers don’t release precise details of how their cameras calculate exposure in evaluative metering mode, there will be a guide in the instruction manual. It’s well worth a read so you understand how it works on your camera.
My preferred way of working is to use evaluative metering, take a photo, look at the histogram and then adjust the exposure if necessary. For me, this is the simplest way of arriving at the optimum exposure. However, everybody works differently and once you understand how the other metering modes on your camera work you may find one of the others is best for you.
Exposure Compensation
Now that you understand more about your camera’s exposure modes, and why they may get the exposure wrong, you need to know what to do when the exposure is incorrect.
If you are using an automatic exposure mode, the easiest way is to use your camera’s exposure compensation function.
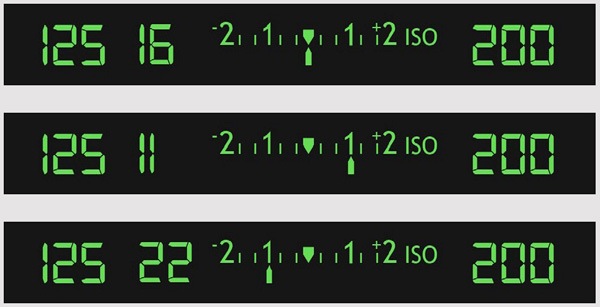
If you’re unsure how to set exposure compensation then check your camera’s manual – each camera is different. On mine, I just turn the Quick Control dial (circled above) on the back of the camera with my thumb. I like this way of working because I can dial in exposure compensation while looking through the viewfinder.
If the photo is underexposed, use exposure compensation to increase the exposure by a stop or two. Then check the histogram to see if the exposure is correct (if you’re unsure how to read the histogram, then read this excellent article).
If the photo is overexposed, you can use exposure compensation to reduce the exposure.
The amount of exposure compensation applied should be displayed in the viewfinder. Again, check your manual. On my Canon cameras the display looks something like the diagrams above. The top display shows zero exposure compensation, the middle display shows +1 stop exposure compensation and the bottom display -1 stop exposure compensation.
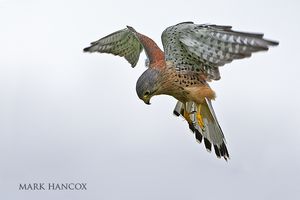
Hummingbirds are well known for their ability to hover, as are insects. However, hovering is a much more rare concept in larger animals, such as birds of prey. Birds of prey typically maintain their altitude while hunting by gliding around in circles, in order to generate lift. Kestrels, however, are the only bird of prey capable of hovering. Unlike smaller hummingbirds, kestrels are incapable of beating their wings fast enough to generate enough lift to keep them aloft, so they have to face into the wind and rely on it to provide lift for them. This “windhovering” technique is so precise that their heads stay completely still, a factor that is estimated to increase their hunting efficiency tenfold.
In average wind speed, the kestrel can glide quite comfortably, flapping its wings at an almost leisurely pace. Although the kestrel flaps its wings as if it were flying normally, its forward movement is cancelled out by the wind, keeping it in the same position. The wind catches not only on the wings of the kestrel, but also on its tail. The tail, already broad, is spread out a bit more and depressed, so that it increases the surface area that is exposed to the oncoming wind. The effects of the tail depression are more obvious when the kestrel is preparing to hover.
Before hovering, kestrels tend to glide for a bit and shoot upwards before any hovering actually takes place. During this upward movement, the wings are still outstretched from the gliding, but the tail is tilted downwards. It is thought that this depression of the tail feathers checks the forward momentum, halting the kestrel in midair.
The design of kestrels’ wing feathers is equally important to its ability to hover. Like other birds of prey, kestrels have slotted high lift wings, and these slots help to reduce turbulence while hovering. If the wings didn’t allow air to pass through them, kestrels would not be able to hover, and would keep stalling instead.
In high winds, the kestrel’s job is easier, and flapping is reduced to a minimum. In even stronger winds, they may not have to flap at all, simply opening their wings and gliding into the wind, a technique called “kiting.”
Although the name “windhovering” suggests the use of wind to hover, some sources claim that kestrels can hover without any wind at all. Their bodies are shaped such that with outstretched wings, kestrels automatically glide forward. This forward movement is cancelled out by rapid wing beats. The downstroke is oriented slightly forwards, like it’s banking before a landing, which pushes the kestrel back in order to negate the forward movement. Hovering without any wind is a lot harder to control, however, and requires a bit of a balancing act. When the kestrel loses its balance, it will often slip forward before regaining control and hovering again. Kestrels will often slip about three times before either moving on or circling around to try again, depending on the possibility of finding prey.
The Bar-headed geese migrate over the Himalayas at heights of over five miles above sea level. Photo: By Diliff/CC BY-SA 3.0
Forget the changing leaves and pumpkin-spiced everything. For bird enthusiasts, fall’s big event is spying birds as they pass through on migration. In North America, most bird species migrate to some extent, with more than 350 species traveling to the tropics each fall.
October is the perfect time to spot winged travelers, so we thought we’d give you a few interesting facts to get you started:
1. At least 4,000 species of bird are regular migrants, which is about 40 percent of the total number of birds in the world. (Although this number will likely increase as we learn more about the habits of birds in tropical regions.)
2. Birds can reach great heights as they migrate. Bar-headed geese are the highest-flying migratory birds, regularly reaching altitudes of up to five and a half miles above sea level while flying over the Himalayas in India. But the bird with the record for the highest altitude ever is the Ruppel’s griffon vulture, which collided with a plane at 37,000 feet (that’s seven miles!) in 1975 and was unfortunately sucked into its jet engine.
3. The Arctic tern has the longest migration of any bird in the world. These black-capped, red-billed birds can fly more than 49,700 miles in a year, making a round trip between their breeding grounds in the Arctic and the Antarctic, where they spend their winters. The lucky bird gets to see two summers a year! And over its lifespan of more than 30 years, the flights can add up to the equivalent of three trips to the moon and back.
The tiny Northern wheatear flies thousands of miles as it migrates. Photo: By Aviceda / CC BY-SA 3.0
4. Speaking of long distances, the northern wheatear travels up to 9,000 miles each way between the Arctic and Africa, giving it one of the largest ranges of any songbird. What makes this an amazing feat is that the tiny bird weighs less than an ounce, on average.
5. The award for fastest bird goes to the great snipe: It flies around 4,200 miles at speeds of up to 60mph! No other animal travels at such speeds for such long distances. Birds usually utilize tailwinds (winds blowing in the same direction they fly) to help them go faster, but the snipe’s speeds don’t seem to be a result of that.
6. The bar-tailed godwit can fly for nearly 7,000 miles without stopping, making it the bird with the longest recorded non-stop flight. During the eight-day journey, the bird doesn’t stop for food or rest, demonstrating jaw-dropping endurance.
7. Migration can be extremely dangerous for birds, and many don’t often make it back to their starting point. Sometimes natural occurrences like harsh weather play a role, but many times, human activities are the cause of birds’ untimely demise. In the United States alone, up to one billion birds die each year from window collisions. And approximately seven million die from striking TV and radio towers in North America annually, ABC News reports.
8. To prepare for the extremely taxing effort of migration, birds enter a state called hyperphagia, where they bulk up on food in the preceding weeks to store fat, which they’ll later use for energy on their long journeys. Some birds, like the blackpoll warbler, almost double their body weight before flying 2,300 miles non-stop for 86 hours.
9. Even birds that don’t fly migrate. Emus, the large Australian birds, often travel for miles on foot to find food, and many populations of penguins migrate by swimming.
Source: Audubon Website
This blog post is authored by Jhaneel Lockhart and appeared on the Audubon website. You will find the original article here.


