Day 1: Pick-up at Ernakulam Station / Kochi Airport by 12:30 hrs. Departure in jeep for Thattekkad Bird Sanctuary with lunch en-route followed by check-in at Jungle Bird Homestay. Bird-watching in & around the resort with some light snacks followed by evening bird trails for nightjars & owls. Back to resort at around 8:30 PM, have dinner and go early to bed.
Day 2: Full day bird-watching in Thattekkad Sanctuary & surrounding areas for the Western Ghat endemics species on foot. Night stay at Jungle Bird Homestay.
Day 3: Start early morning (by 05:00 hrs) for Munnar & Eravikulam National Park. Have lunch at Munnar & continue bird-watching till evening. Night stay at Jungle Bird Homestay.
Day 4: Early morning bird-watching in Thattekkad Bird Sanctuary. Break for lunch followed by another bird-watching session in & around Thattekkad Bird Sanctuary till 15:00 hrs. Drop to Kochi Airport / Ernakulam Station by 17:00 hrs.
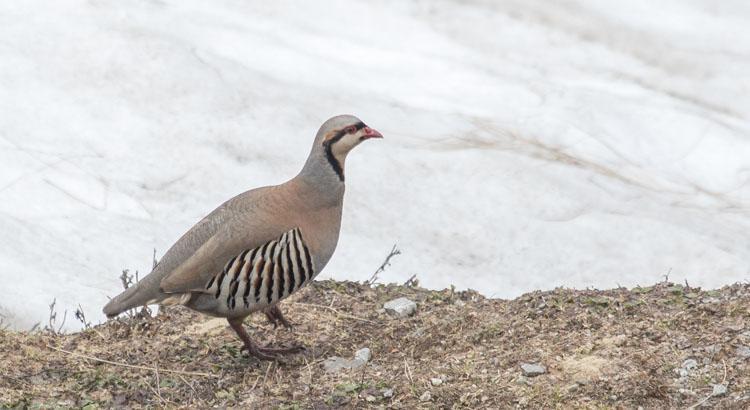
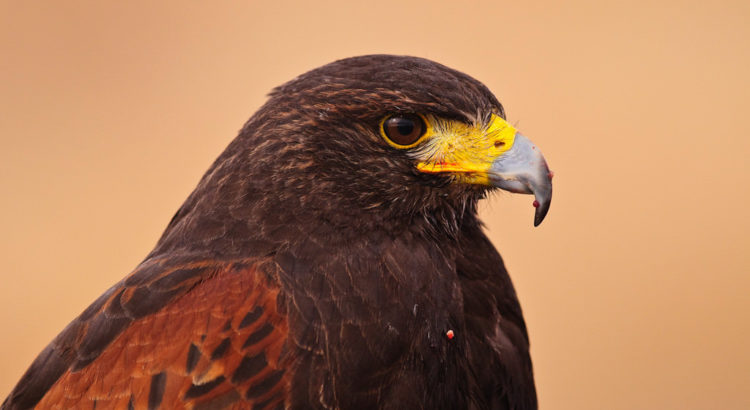
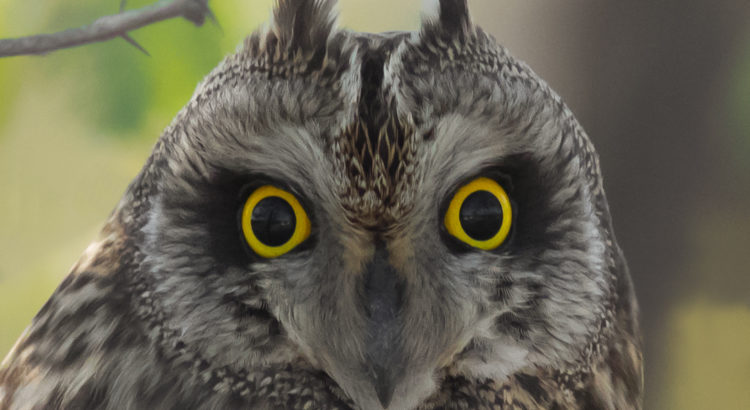
Some of the key species we could sight include Black Baza, Black Eagle, Great-eared Nightjar, Dollar Bird, Red Spurfowl, Lesser Yellow-nape Woodpecker, Speckled Piculet, Mottled Wood Owl, Green Imperial Pigeon, Crested Goshawk, Malabar grey & Pied Hornbill, Malabar parakeet, Flame-throated Bulbul, Dark-fronted & Rufous Babbler, Asian fairy-bluebird, Malabar Trogon, White-bellied Blue Flycatcher, White-bellied Treepie, Nilgiri Wood Pigeon, Nilgiri Pipit, Grey-headed Bulbul, Black & Orange Flycatcher, Broadtailed Grassbird, Nilgiri Flycatcher, White-bellied Shortwing, Whitebellied Treepie & the Wyanad Laughing Thrush.
[rule style=”rule-fadecorder” ]
Note that this is a sample itinerary and can be customized as per your requirements. Please use the form below to let us know about your requirements and we shall get back to you with an updated itinerary along with a tentative cost.
[rule style=”rule-fadecorder” ]
Enquire about this tour
Please include complete details and contact information. In case of any special requirement please include the same in other details section.
Keoladeo National Park or Keoladeo Ghana National Park formerly known as the Bharatpur Bird Sanctuary in Bharatpur, Rajasthan, India is a famous avifauna sanctuary that hosts thousands of birds, especially during the winter season. Over 230 species of birds are known to be resident. It is also a major tourist center with scores of ornithologists arriving here in the hibernal season. It was declared a protected sanctuary in 1971. It is also a World Heritage Site.
Hurry only limited seats available. Booking will be accepted on first come first serve basis.
[rule style=”rule-fadecorder” ]
Tour Itinerary
Mode of Travel: Cycle Rickshaw (2 members per rickshaw)
Day 1: Arrival at Bharatpur @ 13:00 Hrs. Check-in Hotel in Bharatpur. After lunch, proceed to Keoladeo Park in Cycle Rickshaw – Explore the Park till sunset. Return for dinner and Overnight Stay at Hotel in Bharatpur.
Day 2: Early morning breakfast, process to Keoladeo park in cycle rickshaw. Explore the park for scrubland birds. Will carry packed lunch. After lunch will explore near sopan mori and Keoladeo temple. Return for dinner and Overnight Stay at Hotel in Bharatpur.
Day 3: Early morning breakfast, process to Keoladeo park in cycle rickshaw. Explore the park for scrubland birds. Will carry packed lunch. After lunch will explore near sopan mori and Keoladeo temple. Return for dinner and Overnight Stay at Hotel in Bharatpur.
Day 4: Early morning breakfast, process to Keoladeo park in cycle rickshaw. Explore the park for scrubland birds. Return to hotel. After lunch check out and proceed to Jaipur or Delhi for return journey.
[rule style=”rule-fadecorder” ]
Note that this is a sample itinerary and can be customized as per your requirements. Please use the form below to let us know about your requirements and we shall get back to you with an updated itinerary along with a tentative cost.
[rule style=”rule-fadecorder” ]
Enquire about this tour
Please include complete details and contact information. In case of any special requirement please include the same in other details section.
Mishmi Hills are on the Northeastern tip of India, in central Arunachal Pradesh and are a southward extension of the Great Himalayan ranges and its northern and eastern parts touch China. These hills are divided into 2 sections – the flood plains of tributaries of Brahmaputra river and the Arunachal Himalayas consisting of snow-capped mountains, lower Himalayan ranges and Shivalik ranges. This hilly area falls in the Dibang valley and is characterised by steeply sloping landform, sub-tropical evergreen forest and high rainfall.
With around 6000 species plant species, 100 mammals and over 600 bird species, Mishmi is a heaven for nature lovers. Some of the highlight bird species at Mishmi consist Sclater’s monal, Blyth’s Tragopan, Temminck’s Tragopan, chestnut-breasted partridge, Ward’s trogon, Red-headed Trogon Dark-sided thrush, Green Cochua, Purple Cochoa, Rusty-bellied and Gould’s shortwing, Beautiful Nuthatch, Mishmi Wren-babbler, Chevron-breasted Babbler Fire-tailed myzornis, 3-4 parrotbill species, Grey-headed bullfinch and so on.
[rule style=”rule-fadecorder” ]
Suggested Tour Itinerary
Day 1: Pick from dibrugarh airport and transfer to Mishmi Hills. Birding at Maguri Beel. Dinner and overnight at Forest rest house.
Day 2: Wake up at 0500hrs, birding in and around Mayodiya Pass. Discussions on species and consolidation of bird list for the day. Dinner and overnight at Forest rest house.
Day 3: Wake up at 0500hrs, birding in and around Tiwarigaon. Discussions on species and consolidation of bird list for the day. Dinner and overnight at Forest rest house.
Day 4: Wake up at 0500hrs, birding in and around Hunli. Discussions on species and consolidation of bird list for the day. Dinner and overnight at Forest rest house.
Day 5: Wake up at 0500hrs, birding in and around Tiwarigaon and transfer to Tinsukia. Consolidation of entire bird list for the tour. Overnight at Tinsukia.
Day 6: Morning session at Maguri Beel. Check out from Tinsukia and proceed to Dibrugarh airport.
There might be variations in itinerary based on the local weather conditions and inputs from our local experts at Mishmi hills.
Note: The Stay at Forest lodge in Mishmi Hills will be on Twin sharing with very basic amenities. We shall only have 2 hrs of electricity supply, primarily to charge our camera batteries and mobile phones. The mobile network connectivity will also be limited.
Note that this is a sample itinerary and can be customized as per your requirements. Please use the form below to let us know about your requirements and we shall get back to you with an updated itinerary along with a tentative cost.
[rule style=”rule-fadecorder” ]
Enquire about this tour
Please include complete details and contact information. In case of any special requirement please include the same in other details section.
The Andaman and Nicobar Islands – one of the seven union territories of India, are a group of islands at the juncture of the Bay of Bengal and Andaman Sea. Its also one of the major bird watching destinations in India, with around 270 bird species out of which few are endemic to the region.
Tour Itinerary
Day 1: Arrival & Birding at Sippighat Wetlands.
Day 2: Morning Session at Shoal Bay; Evening Session at Garacharma Wetlands.
Day 3: Full Day Birding at Chidiyatapu.
Day 4: Birding at Ograbranj Wetlands.
Day 5: Birding at Mt. Harriet National Park.
Day 6: Departure.
[rule style=”rule-fadecorder” ]
Photography tour for small group or personalized tour can also be arrange. Please email us for cost and more details.
[rule style=”rule-fadecorder” ]
Note that this is a sample itinerary and can be customized as per your requirements. Please use the form below to let us know about your requirements and we shall get back to you with an updated itinerary along with a tentative cost.
[rule style=”rule-fadecorder” ]
Enquiry about this tour
Please include complete details and contact information. In case of any special requirement please include the same in other details section.
Bird photography, especially wild bird photography can be quite challenging. There are many articles on the Internet that cover everything from “bird photography tips” to “the art of bird photography”, but I found that many of them are not detailed enough and do not contain as much information for an amateur bird photographer. After several years of photographing birds, I decided to write this “How to photograph birds” guide and include everything I know about taking good pictures of birds. Since most of the bird photography nowadays is done on digital, the instructions below would work great for digital cameras. If you are still shooting film, just skip the parts that do not apply to film (such as RAW format, etc). Parts of this article also apply to birding or bird watching, so if you like birds and just want to be able to approach and watch them closely, read the Locating Birds and Approaching Birds sections only.
Note: This guide will work for any DSLR camera, but since I am a Nikonian, I will only cover settings for Nikon DSLRs and provide detailed information on Nikon lenses that are best for bird photography. This guide could be used for any type of wildlife photography, but I will be concentrating on fast-moving birds and birds in flight, so if you are taking a picture of a fast-moving animal, feel free to use the same camera settings.
How to photograph birds or
A photographer’s step-by-step guide to bird photography
NIKON D300 @ 200mm, ISO 200, 1/250, f/5.0
1) First things first – Your camera equipment
Unfortunately, camera gear is the most important part of wild bird photography. Forget about taking pictures of birds with a point and shoot or a DSLR with a wide angle lens, unless you are standing close and photographing ducks and geese that are not afraid of people. If you want to shoot wild birds, prepare yourself to invest in a fast DSLR camera and one or more telephoto lenses.
So, what DSLR is good for fast-action photography? I would recommend a fast camera that can handle at least 1/2000 of a second shutter speed with 6 to 9 fps (frames per second), if you want to get the best results, plus a good autofocus system for quick focus acquisition. Any modern DSLR is capable of shooting at 1/2000 of a second and faster. Fast frames per second and good autofocus mean professional cameras such as the Nikon D300/D700/D3 or Canon 50D/1D/1Ds that are suited best for fast-action and wildlife photography. But if you already have an entry-level DSLR, it doesn’t mean that you cannot capture birds – it just means that you might miss a good shot, just because your camera is not fast enough. The most important thing to keep in mind – the speed of focus acquisition both on camera and on lenses are far more important than DSLR’s frames per second.
NIKON D300 @ 370mm, ISO 450, 1/250, f/8.0
Which brings us to the next question: What lenses are good for bird photography?
It is tough to answer this question, because it all depends on how much money you are willing to put into a lens. The best bird photographers in the world will tell you that they cannot live without their 500mm and 600mm lenses, preferably with optical stabilization + teleconverters. The Nikon 500mm f/4 VR currently sells for approximately $8,500 USD, while the 600mm f/4 VR is about $10,300 USD. That’s very pricey and only professionals who make money by selling their images and people with large wallets can buy those lenses. If you are one of those, the best combination for bird photography would be Nikon D3s + 600mm f/4 VR + 1.4/1.7 TC (TeleConverter), which will altogether cost you about $15K and give you the best performance and reach. In addition, you will have to buy a good heavy duty tripod + accessories (batteries, memory cards, etc), which will cost another $2-$3K. The “not-so-bulky” and somewhat hand-holdable Nikon 300mm f/2.8 + 1.4x/1.7x TC or Nikon 200-400mm f/4.0 + 1.4x TC will also yield excellent results and run at about $5-6K USD, but at the cost of the extra reach. On the Canon professional side, the choice is similar to Nikon’s, except for the excellent Canon 800mm f/5.6L IS (Image Stabilization), which is actually lighter than the 600mm f/4.0L IS and gives more reach. On the flip side, Canon also does not have anything similar to the versatile Nikon 200-400mm f/4.0.
NIKON D300 @ 400mm, ISO 200, 1/1600, f/4.0
For everyone else on tight budgets, the choice is limited to shorter focal lengths, plus teleconverters. As of today, the best affordable Nikon lenses for bird photography are either the 300mm f/4.0 AF-S or the 80-400mm f/4.5-5.6D VR. I tried both the 300mm f/4.0 AF-S and the 80-400mm f/4.5-5.6D and ended up getting the 300mm f/4.0 AF-S with a teleconverter. Equipped with a fast AF-S autofocus system, the Nikon 300mm f/4.0 + 1.4x TC is essentially a 420mm f/5.6 lens that produces very sharp and crisp images with a pleasing background blur (bokeh). The only big negative on the Nikon 300mm f/4.0 is lack of VR, which I hope Nikon will add into the future versions of this excellent lens. I have tried the 300mm f/4.0 with a 1.7x teleconverter, but was not impressed with the results. Although autofocus still works, the camera starts to haunt, trying and failing to acquire accurate focus. At 510mm f/7.1, you would need good stabilization and plenty of light to have acceptable images. Just remember that whenever you go beyond f/5.6 on a lens with a teleconverter, Nikon will not guarantee autofocus to work. In fact, if you read the Nikon lens manuals, they state that autofocus does not function beyond f/5.6 period, although as I said earlier, it does work, but not very well. I have also tried the Nikon 70-200mm f/2.8 VR II + 1.4x/1.7x TC and I can tell you that the 300mm f/4.0 beats this combo hands down in terms of IQ, focal length, sharpness and bokeh. If you are a Canon shooter, the best bird photography lenses are the Canon 300mm f/4.0 IS + 1.4x TC, the Canon 400mm f/5.6L (but no IS) or the Canon 100-400mm f/4.5-5.6L IS. Some birders report good results with the Sigma “Bigma” (Sigma 50-500mm f/4.0-6.3), but I have not tried this lens and therefore cannot compare it with others.
NIKON D300 @ 400mm, ISO 280, 1/250, f/5.0
So far, everything that I have mentioned above in terms of focal length was for lenses alone. Once mounted on a DSLR body, the camera sensor type will also impact the field of view, meaning what you actually see in the frame and in the image. Compared to full-frame sensors, crop factor sensors will generally provide a better reach, due to the smaller size of the sensor. If this sounds confusing, see my DX and FX and Equivalent Focal Length and Field of View articles. All Nikon DX sensors have a crop factor of 1.5x, while Canons are 1.6x. So, the actual field of view, which some photographers call “equivalent focal length” (meaning equivalent compared to 35mm film/full-frame) can be approximately calculated by multiplying this crop factor by the total focal length of the lens + teleconverter. For example, the Nikon 300mm f/4.0 lens with a 1.4x teleconverter (420mm total) mounted on a DX camera would have an equivalent field of view as a 630mm (420mm x 1.5) lens on a full-frame (FX) sensor. Meaning, if you were photographing a bird from say 10 feet away and you could fill your frame with the bird using a Nikon 300mm f/4 lens with a 1.4x teleconverter on a DX camera, you would need a 630mm lens if you were shooting a 35mm film or FX camera to fill the frame the same way.
Being able to reach birds from a distance without distracting them is a major part of bird photography and this combination of a long telephoto lens with a DX sensor camera definitely provide more opportunities for successful birding. The downside of a crop-factor sensor, however, is the amount of noise on images at high ISO levels – so better reach does not necessarily mean better quality. As I have pointed out in my DX vs FX article, full-frame sensors control noise much better than crop-factor sensors, especially in challenging light. So both have advantages and disadvantages – DX gives you better reach, while FX gives you better quality. I prefer the latter, but I know many bird photographers prefer better reach instead. Keeping a fast shutter speed and retaining low ISO requires lots of light, especially on a lens combination with a maximum aperture of f/5.6. Therefore, in low-light situations, I would recommend to shoot on a tripod at slower shutter speeds rather than cranking up the ISO and having images with less detail. Birding is all about retaining the detail and having sharp images – nobody likes bird pictures that are soft or out of focus. The maximum ISO I typically use on my DX body is 800, while using 1600 and sometimes even 3200 on a full-frame FX body, which produce images with enough detail for my bird photography needs. Noise can be dealt with during post-processing, but lost detail cannot never be recovered.
What about tripods? If you use heavy 500mm or 600mm lenses, a good tripod system (a tripod and a tripod head) is a must, simply because hand-holding these lenses is not practical. The best tripods are made by a company called “Gitzo” and they manufacture carbon-fiber tripods that are extremely stable and lightweight. The best and the most expensive heavy-duty tripod heads for bird photography are “Gimbal” type heads by Wimberley or Kirk Enterprises with Arca-swiss quick-release systems. They handle heavy lenses very well and provide enough flexibility to shoot birds in flight. If you are looking for something more affordable, check out some of the cheaper Gitzo or Bogen tripods and RRS or Kirk ballheads. I prefer the Arca-swiss quick-release systems because they provide the most stability and are very easy to use. I do not recommend mounting lighter lenses on a tripod for bird photography, unless, you are standing in one spot and shooting a particular area or, as I’ve said above, there is not enough light to shoot hand-held.
2) Camera settings
Maintaining fast shutter speeds, especially for birds in flight and small birds that move very quickly is extremely important – you cannot fix motion blur in post production. In some cases, photographers shoot at slightly slower shutter speeds just to get the bird’s wings slightly blurred, to create a feeling of motion. But in all other cases, you want to freeze the bird completely, to fully freeze the action. To achieve this, I typically set my shutter speed to a minimum of 1/800-1/1600. Most digital SLR cameras have the following camera modes: “Manual“, “Shutter Priority“, “Aperture Priority” and “Program“. The camera mode I use the most for my photography, including birding is “Aperture Priority”. Many cameras today come with Auto ISO feature that automatically adjusts the ISO based on light conditions. You can set a minimum shutter speed, which can be set to a high number for bird photography and maximum ISO to retain the detail. This feature is very useful and I use it all the time, setting the Auto-ISO to on, maximum ISO to 800 on DX sensor and 1600 on FX sensor and minimum shutter speed to 1/800 of a second. The latest generation of Canon DSLRs also have the Auto-ISO capability, but it is not as versatile as Nikon’s. When shooting in “Aperture Priority” mode, which I use the most, I set the Auto-ISO minimum shutter speed to 1/800 and shoot wide open, i.e. with a maximum aperture. The nice thing about shooting in “Aperture Priority” mode, is that if there is too much light, my shutter speed increases to a bigger number and if the light deteriorates, the camera’s Auto-ISO feature increases the ISO and tries to keep the shutter speed at whatever I set it to. If the highest ISO is already reached and there is still not enough light, it will obviously decrease the shutter speed, while still keeping the exposure consistent. Another reason for using “Aperture Priority”, is a quick ability to change the aperture of the lens to capture a bigger area and control bokeh. For example, if I’m shooting wide open at f/4.0 and standing close to a bird, my depth of field is very shallow and if I focus on the eye of the bird, I might not be able to capture its back or tail in full sharpness. By increasing the lens aperture to a higher value, I can increase the depth of field and capture the bird in full detail. I personally do not find “Shutter Priority” useful for bird photography, because I do not want my camera to set the aperture for me. Because I will be shooting at high shutter speeds, most likely the aperture will be always set to wide open, so I do not see the point of shooting in this mode. Worst of all, if the light conditions change instantly (let’s say the bird moved from an open area to a shadowy branch of a tree), since the camera is set to “Shutter Priority” and therefore will always shoot at the predefined shutter speed, the image might come out underexposed, even with the Auto-ISO turned on.
What about shooting hand-held? If you have a very high shutter speed, shooting hand-held should not be a problem. However, sometimes the lighting conditions are very poor and you cannot use fast shutter speeds. Once your shutter speed drops to a certain threshold, you will start getting blurry images. How do you avoid that? The general formula is to keep the shutter speed to at least the total focal length of the lens. So if you are shooting with a 300mm lens, your shutter speed should be at least 1/300 of a second on a 35mm film/full-frame body. If the 300mm lens is mounted on a crop-factor sensor, the shutter speed should be at least lens focal length multiplied by the crop factor – 1/450 of a second in this case.
NIKON D300 @ 380mm, ISO 800, 1/250, f/4.0
So here are my Nikon camera settings for bird photography:
Camera mode: Aperture Priority with aperture set to maximum aperture (wide open).
Metering: “Spot Metering” (a single dot).
Auto-focus: High Speed Continuous Mode (set to “C” in front of the camera and to “Ch” on the camera dial), AF Area Mode Selector set to the middle selection (cross-hair).
Shooting Menu:
Image Quality: RAW, 12-bit on Nikon D300 and 14-bit on Nikon D700
NEF (RAW) recording: Type: Lossless compressed, NEF (RAW) bit depth: 12-bit on D300, 14-bit on D700/D3
White Balance: Auto
Active D-Lighting: Off
Vignette Control: Normal
High ISO NR: Normal
ISO Sensitivity: 200, ISO sensitivity auto control: On, Maximum sensitivity: 800 (DX) or 1600 (FX), Minimum shutter speed: 1/800
Custom Setting Menu:
AF-C priority selection: Release + focus
AF-S priority selection: Focus
Dynamic AF area: 51 points
Focus tracking with lock-on: Short
AF activation: Shutter/AF-ON
AF point selection: 51 points
ISO sensitivity step value: 1/3
EV steps for exposure cntrl.: 1/3
Exp comp/fine tune: 1/3
Beep: Off
Viewfinder grid display: On
Multi selector center button: Shooting mode: Reset (Select center focus point), Playback mode: Zoom on/off, Medium magnification
The items I highlighted in red are the ones that are important for me. I always shoot images in RAW, because it is nearly impossible to recover enough detail and colors from JPEG images. Plus, you do not have to worry about color balance, color space and many other things if you shoot in RAW. Some people might argue that shooting RAW is a waste of space and is too complicated, but space is not a problem nowadays as you can buy terabytes of hard drive space (which will last you a very long time) at several hundred dollars. The only issue with shooting RAW is that your camera buffer could quickly fill up, causing your frame rate to drop to only 1-2 frames per second or below. I recommend shooting with fast CompactFlash and SD cards, so that the memory does not become the bottleneck. By the way, some professional cameras like Nikon D3s can be upgraded to have more internal buffer memory. Once upgraded, it would be almost impossible to fill up the buffer, even while shooting RAW.
NIKON D300 @ 550mm, ISO 200, 1/1000, f/5.6
3) Locating birds
Now that you have your equipment set up, you need to find birds to photograph. I recommend starting with the most common birds such as finches, sparrows and robins that are used to people and do not mind cooperating with and posing for photographers. Try to develop some skills and techniques by photographing them sitting on benches, eating, sleeping and flying. The best time for photography is either during the early morning or late afternoons and the same thing applies for birds. Early morning is typically the best for bird photography, because birds actively look for food for themselves and their youngsters. So try to go out and shoot some local birds and see what you can do. Review your images after the photo shoot and see what you don’t like about your pictures. Whether you have a sharpness problem or focus issues, the best way to improve your bird photography is to practice more.
NIKON D300 @ 400mm, ISO 400, 1/500, f/4.0
Once you are done with practicing, go for a real photo shoot. Some of the best opportunities for bird photography might be very close to you. Start off by just Googling for “best birding in your_state” or “top birding locations in your_state”. For example, if I Google for “best birding in Colorado”, plenty of different links come up that point to good birding locations, some only several miles away from where I live. Many of the links will also contain detailed information on different bird species, their habitat, migration patterns and a lot more. Another great source of information on birds is to contact your local bird-watching clubs and groups. Some might even have mailing lists for sharing information on rare sightings of birds. Thanks to the big number of bird watchers, there are plenty of other online resources, books, magazines, newspapers and much more, and locating birds is not hard at all. What is hard, is locating rare and exotic birds and photographing them, especially if they are very shy.
If you have a hard time locating birds or want to photograph birds from a close distance, a local zoo or a bird sanctuary might be excellent opportunities for bird close-ups. The National Audubon Society, for example, organizes various bird-watching activities and tours that you can sign up for. There are plenty of other organizations that look for all kinds of volunteers and sometimes even volunteer photographers.
NIKON D700 @ 420mm, ISO 800, 1/1000, f/5.6
4) Approaching birds
What do you do if the bird you are trying to approach gets scared and flies away? There are many different techniques to approach wild birds and I will go through what works for me. Pretty much all birds have superb vision, so it is very likely that the bird will see you first. Also, all birds have their own “comfort zones” and if you try to get any closer, they feel threatened and fly away. Different birds have different tolerance levels for human interaction. Some birds will let people pretty close, especially if they are used to them – those birds are the easiest to photograph. And then there are birds that are extremely shy, that will not let you come anywhere close. Those birds are extremely hard to photograph and you will have to understand the bird behavior to get closer. The key to successful bird photography, is to make the bird feel safe and natural. Some skilled birders can approach birds very closely, sometimes way beyond their comfort zones. How do they do it? Most of them will respond that it is all about patience. Birds feel threatened when you approach them too fast directly. They also feel threatened when you look directly at them, as any other animal would.
NIKON D700 @ 300mm, ISO 1600, 1/1250, f/5.6
So, here is my technique to approach shy birds:
Do NOT wear clothes with bright colors and try to blend in with the environment as much as possible. Although some photographers prefer wearing camouflage, I personally wear gray or light blue shirts with blue jeans, which work great.
If you are hiking and have been walking fast and all of a sudden you spot a bird that you want to photograph, slow down. Don’t change your walking speed right away – slow down marginally, so that the bird does not detect sudden changes in your behavior.
Do NOT make sudden moves. If you need to raise your camera and take a picture, do it very slowly.
Turn off your cell phone or put it on silent mode. It really sucks when you are close to a bird and your phone starts ringing…
Once you see a bird, do NOT walk straight towards the bird, but rather walk slowly in zigzags. Sometimes walking in zig-zags is not very practical, especially if you have already scared the bird by your presence. The key is to walk slowly (sometimes 1-2 feet per minute or slower), no matter how you are approaching the bird. Also, instead of walking from heel to toe, try the other way around, keeping your weight on your back foot as you walk.
Try not to walk if the bird is looking at you. The best time to approach is when the bird is looking away or is busy doing something.
Keep your noise to a minimum. Noise is hard to control if you are walking through bushes or if you have to step on fall leaves that create a cracking sound, so watch what you are stepping on and do it very slowly to diminish the noise.
See if the bird is already scared – if it is staring at you and stopped doing whatever it was doing before, it means that the bird is on alert and might fly away any time. You can also tell if the bird is scared if the bird is raising its tail and pooping (especially raptors).
Do NOT stare at the bird while approaching it. Animals in general perceive direct eye contact as a threat and they will flee at their first opportunity.
Your camera shutter will most likely scare the bird you are approaching. Therefore, I recommend shooting the bird as you approach from the distance, so that the bird gets used to the shutter clicking noise.
In some cases you might be lucky enough to meet a “YASJ” (young and stupid juvenile). Juvenile birds are typically very curious and will let you approach them very closely. Even if juvenile birds allow you to come very close, still try to keep your distance. If you are able to fill the viewfinder with the bird, you are already too close. Moreover, standing too close to a bird is also problematic, because only a part of the bird will be sharp, due to a shallow depth of field, so you will then have to close down your aperture, which also means losing shutter speed.
NIKON D700 @ 420mm, ISO 250, 1/2000, f/5.6
5) Photographing birds
Photographing birds and making beautiful pictures requires good knowledge of your photography equipment. For birds in flight, high shutter speeds are required or the bird will look blurry. I find that a minimum shutter speed of 1/800-1/1600 for birds in flight works great for me, but in some cases slightly lower shutter speeds are also OK, depending on the size of the bird and how fast it is flapping its wings. For example, to freeze this hummingbird in flight, I used a shutter speed of 1/1600 and even then, the wings look slightly blurred, just because the bird flaps wings faster than my shutter speed.
NIKON D700 @ 300mm, ISO 800, 1/1600, f/5.0
Bokeh is another key factor to successful bird photography. In most cases, it will be hard to control the bokeh simply because the bird will not let you walk around and plan your shot, but there are a few things you can do to achieve great bokeh. Make sure that there is a good distance between the bird and the objects behind it. The greater the distance, the better the background blur (although it is more complex than that, because the distance between you and the bird and your lens focal length/lens optics all play roles in the quality of bokeh). Some photographers set up clear benches near bird hot spots or at their houses, which works great because they can set up feeders and take clear pictures of birds with a controllable background. You can find similar opportunities with bird feeders at a nearby park. Also, shooting birds in winter (depending on your climate) generally yields better results simply because tree branches are clear and birds cannot hide behind leaves. For shorebirds and other water birds that do not sit on branches, the best way to achieve great bokeh is by laying on the ground/sand when the bird is out of the water.
NIKON D300 @ 280mm, ISO 800, 1/250, f/6.3NIKON D300 @ 420mm, ISO 200, 1/250, f/6.3
Here is how I recommend to photograph birds:
Shoot at high shutter speeds of 1/800 and above to freeze the bird. For birds in flight and fast-action scenes, use shutter speeds above 1/1600. For birds that are just sitting on benches and not being active, you can use slower shutter speeds of 1/250-1/800 and lower ISO for better image quality (a tripod or a monopod for slower shutter speeds is highly recommended).
Always focus on the nearest (to the viewer) eye of the bird. It is acceptable to have a blurred tail or other parts of the bird, but at least one eye always needs to be in focus and sharp. For birds in flight, focus on the bird’s head or chest – whichever provides better contrast for the camera autofocus system.
Choose your background carefully to achieve a smooth bokeh. Pictures with objects behind the bird are not as pleasant as pictures with a smooth background.
Be patient and wait for the bird to act naturally. Images with a bird sitting on a bench are boring, so try to capture interesting action instead.
Use a blind whenever possible. One of the best blinds is your car and you could get pretty close to a bird without scaring it with your vehicle. Birds are generally not scared of cars and you could drive up fairly closely and take some amazing shots. I have taken many beautiful shots of birds directly from my car, without getting out of it. Hunting blinds also work very well if you find the right spot such as a pond or a feeder.
Having a camera flash extender such as the “Better Beamer” is very helpful for fill flash, especially to photograph birds under tree leaves or in darker areas.
Shoot lots of images. I typically shoot a single image first, then take a look and make sure that the images are sharp and in focus. If everything looks good, I will shoot the bird in bursts of 5-10 frames at a time. Having a fast camera that can handle 5-6 frames per second is very helpful. I then go through hundreds or sometimes even thousand of pictures at home and delete the images that I do not want.
Try to position yourself with your back towards the sun. Sometimes having the sun to the far left or right is OK, but having it behind you will give you the best light.
Shoot either early in the morning or closer to the evening. You will find that early morning or later afternoon provides the best opportunities, because the birds are hungry and are looking for food. I personally prefer to shoot early in the morning – that’s when the birds are most active.
Try not to take pictures of birds in flight during a cloudy day. Photographs of birds with white or gray backgrounds don’t look as good and are hard to deal with during post-processing.
NIKON D700 @ 45mm, ISO 560, 1/250, f/4.0
6) Post-processing and cropping
I use Adobe Lightroom and Photoshop to store and process all of my photographs. Lightroom is a great and easy tool to organize your images and catalog your bird collection, while Photoshop is great for fixing images that cannot be fixed within Lightroom. I probably spend 90-95% of my time in Lightroom and about 5-10% in Photoshop. I shoot everything in RAW (and I recommend you do, too), so I can achieve much better results while manipulating images in Lightroom or Photoshop, since I have a wide spectrum of colors that I can work with and maximum image quality.
Cropping is a big part of bird photography. Unlike people, birds do not sit and pose in front of the camera, so filling the frame with the bird is not always possible. If you photograph a bird from a distance and try to resize the image to a smaller resolution for the web, the bird will look too tiny. You wouldn’t be posting the high resolution image either, because at 10-15 megapixels, the image will not fit into any standard monitor screen. Cropping helps photographers bring birds closer to the viewers and highlight them, rather than distracting the view with unwanted objects. So, how much should you crop? It depends on how much space the bird takes in your photograph. If it is almost filling the frame and you just need to get rid of some unwanted objects, cropping works like a charm; you could also make large prints at that resolution. However, if the bird is only taking up 5-10% of the frame, cropping will work for the web, but not for large print, so keep that in mind.
Good luck and have a fun time photographing birds!
Being one of our favourite bird-watching destinations, we never miss out on Little Rann of Kutch and so was the case this year as well. We got some lovely sightings of over 100 species of birds along with some lovely photographic opportunities to capture species like Short-eared Owl, Montagu’s & Pallid Harriers, Dalmatian & Great White Pelicans, Greater & Lesser Flamingos, Greater Spotted, Steppe & Eastern Imperial Eagles and the endemic Indian Wild Ass.
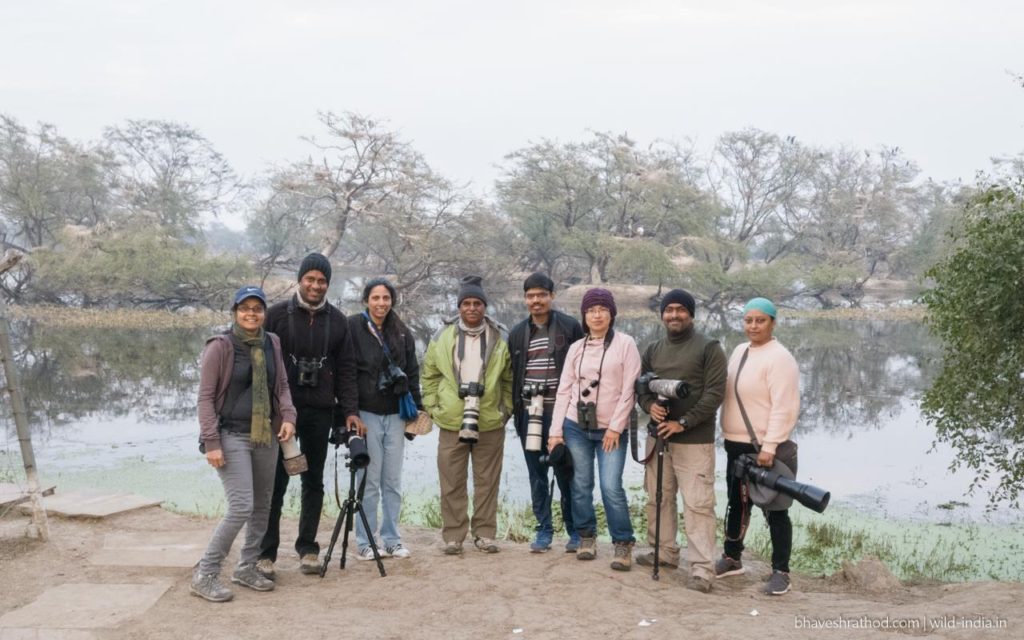
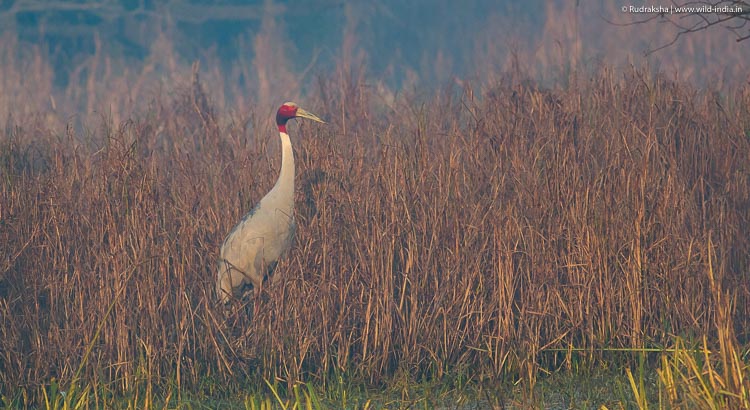
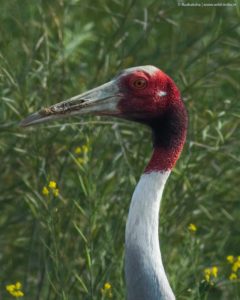
Foggy mornings, Sarus Cranes, Bluebulls, Pelicans, loads of waterfowls and some mesmerising sunrise & sunset scapes is what you associate with Keoladeo National Park at Bharatpur. We at Wild India Eco Tours had one such trip with an amazing bunch of folks to this place in January 2017.
Tour dates: 13 – 15 January 2017
Group size: 8
Total birds species sighted: 115
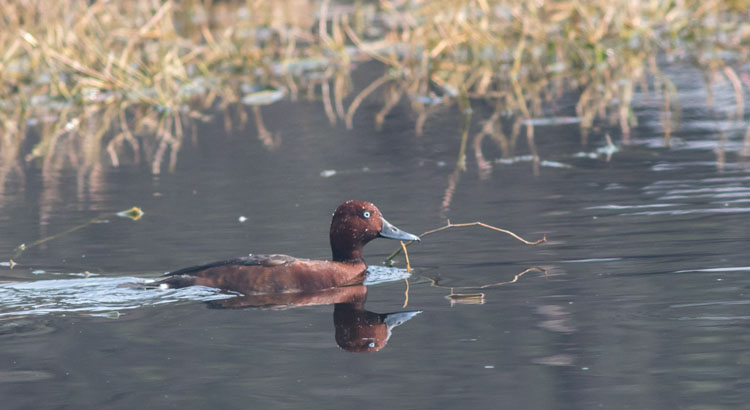
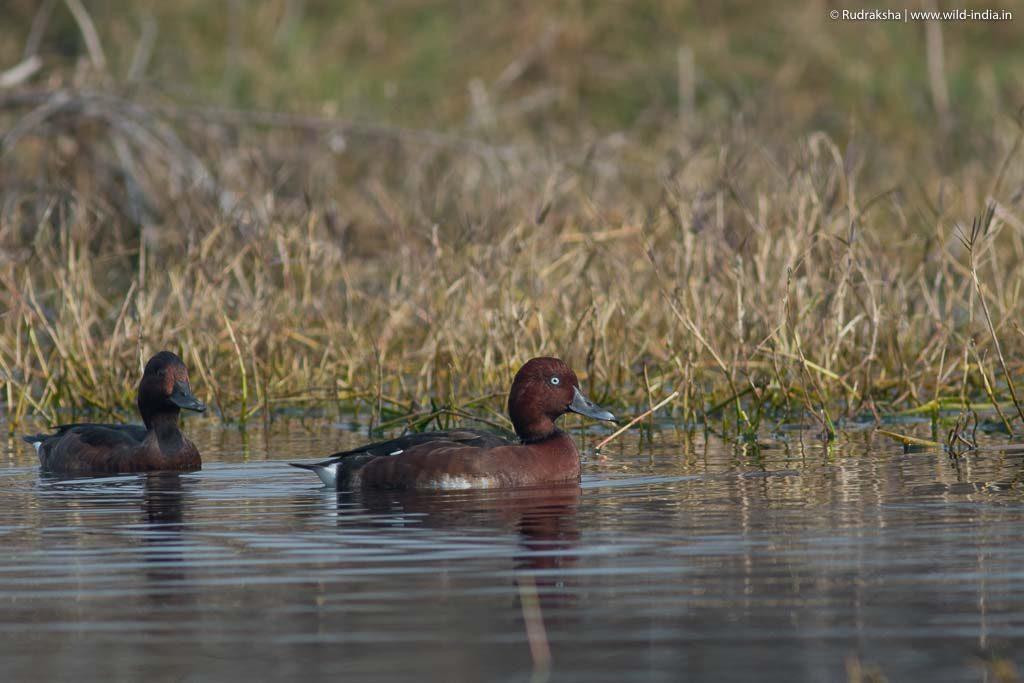
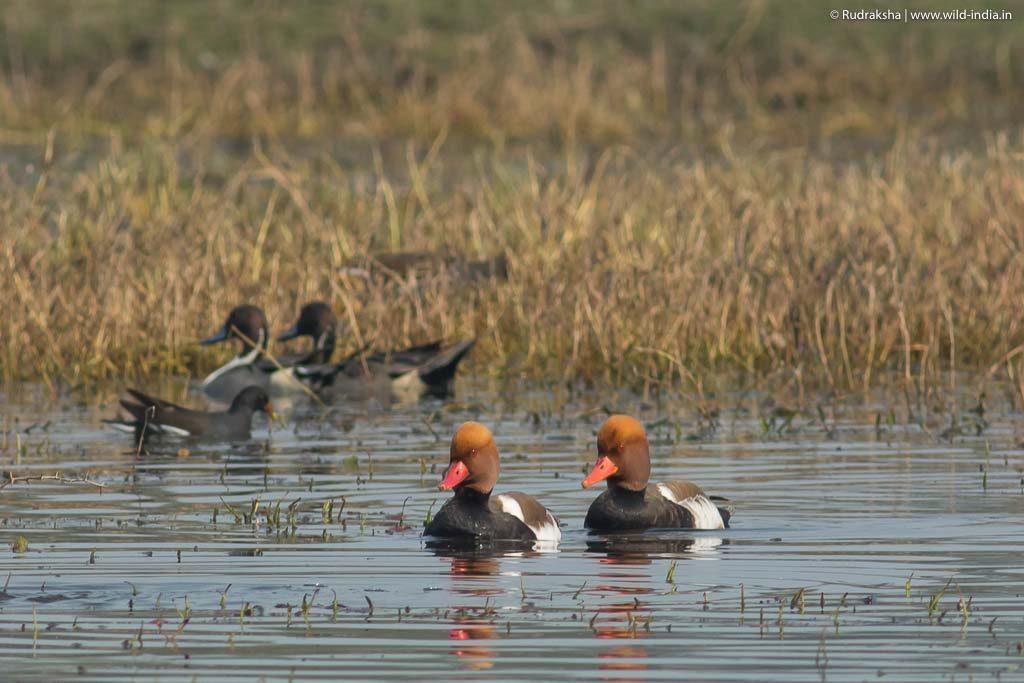
Key highlights: Sarus Cranes, Dalmatian & Great White Pelicans, Black & Yellow Bitterns, Black-necked Stork, Dusky Eagle Owl, Oriental & Collared Scops Owls, Red-crested Pochards, Ferruginous Ducks
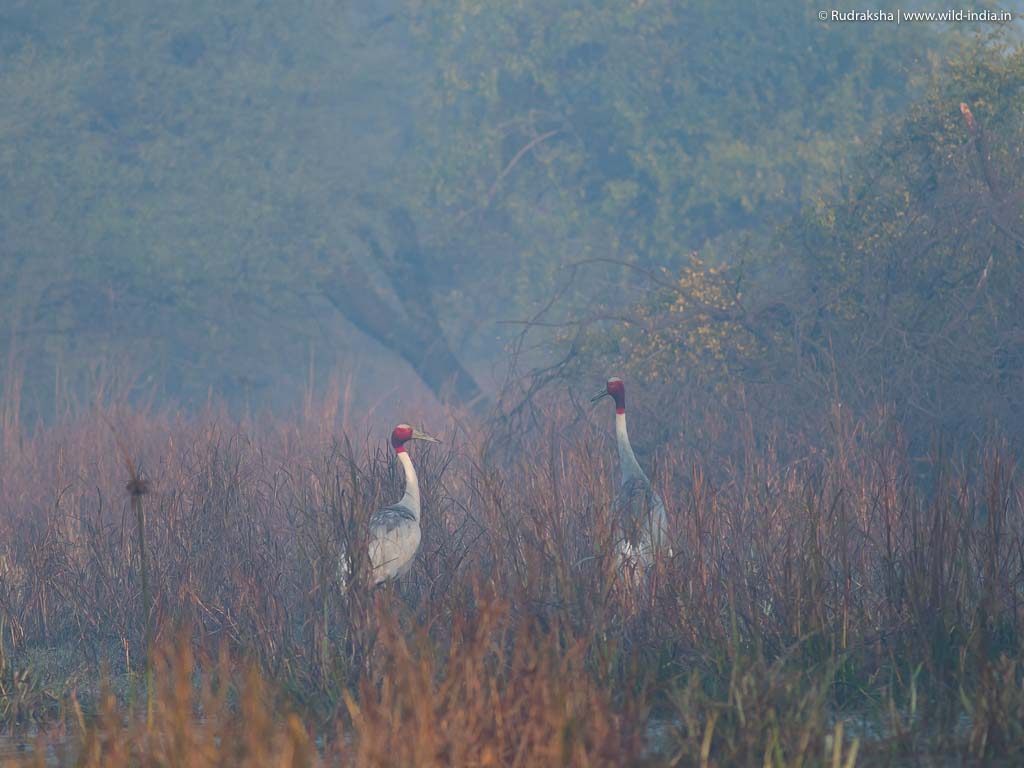
Starting from Delhi, we began our journey to Bharatpur by 10:00 hrs after some expected flight delays. We took our 1st halt just after we joined the Yamuna Expressway for a quick snack. A 30 minute break and we were back on our journey. As we neared Mathura, we stopped for our 1st sighting – it was a family of Sarus Cranes!
This was surely some start to the tour as everyone got good views and photographs of this lovely species. Resuming our journey, we arrived at the resort by 14:30 hrs and after a quick lunch and freshening up, we were ready for our 1st excursion to Bharatpur Bird Sanctuary by 16:00 hrs.
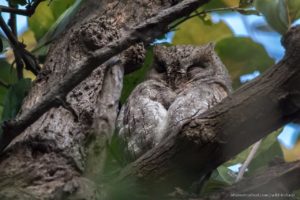
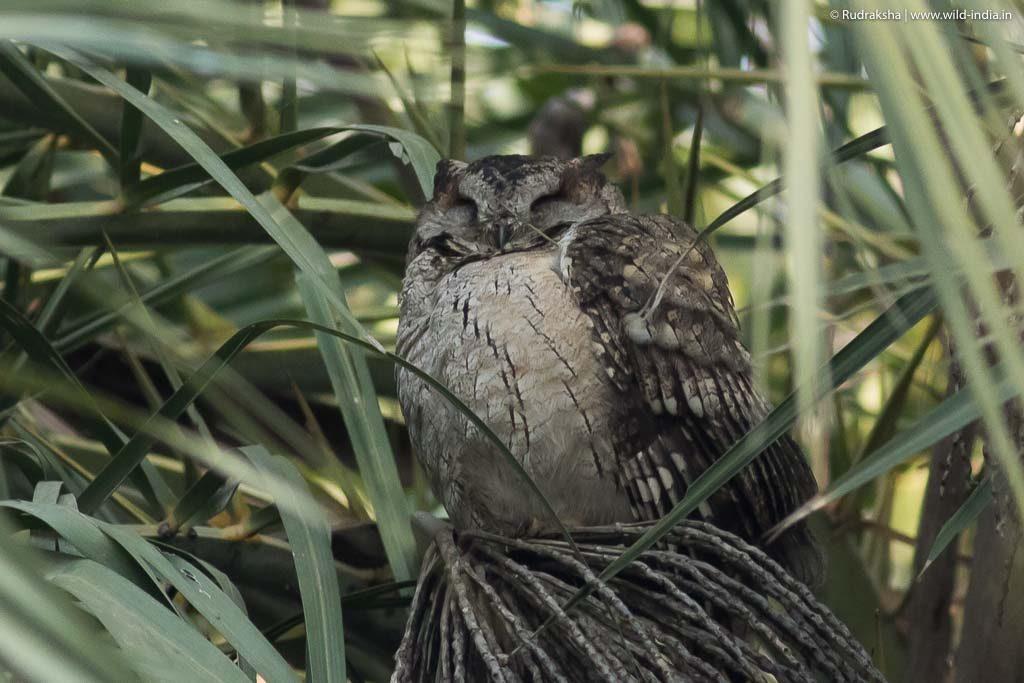
Splitting into groups of 2, we began our excursion on the cycle rickshaws. We came across various species of ducks – Common teals, Northern Pintails, Gadwalls, Little Grebes along with numerous Common Moorhens & White-breasted Waterhens. We also got some lovely views of the Oriental Scops Owl – camouflaged perfectly in a tree. Going ahead, we reached an opening were we got to see a pair of Bluebull walking across the wetlands.
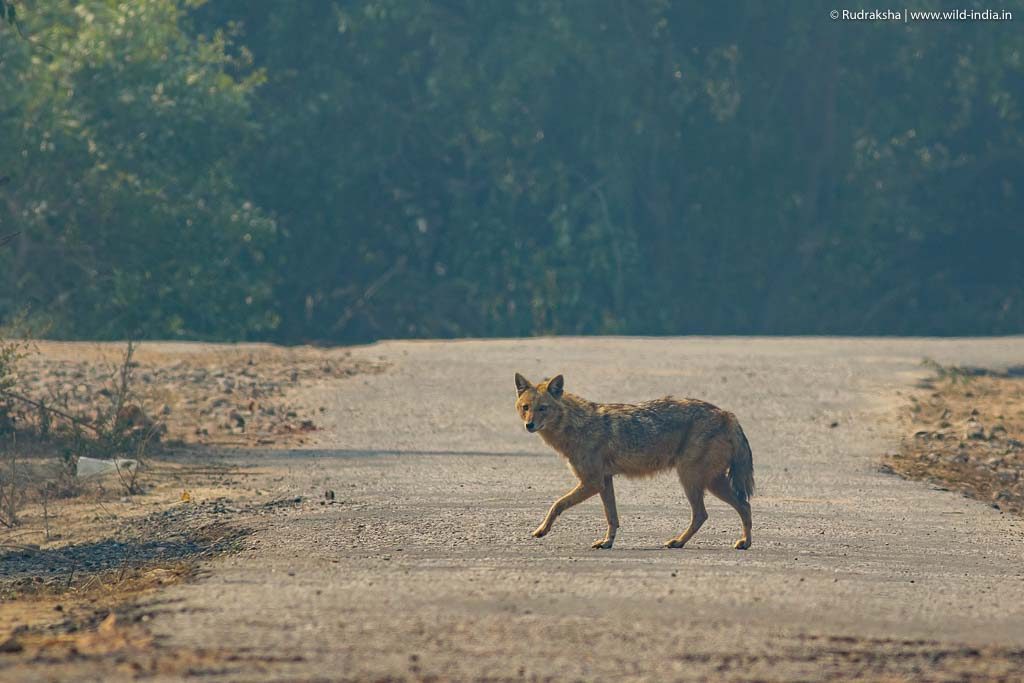
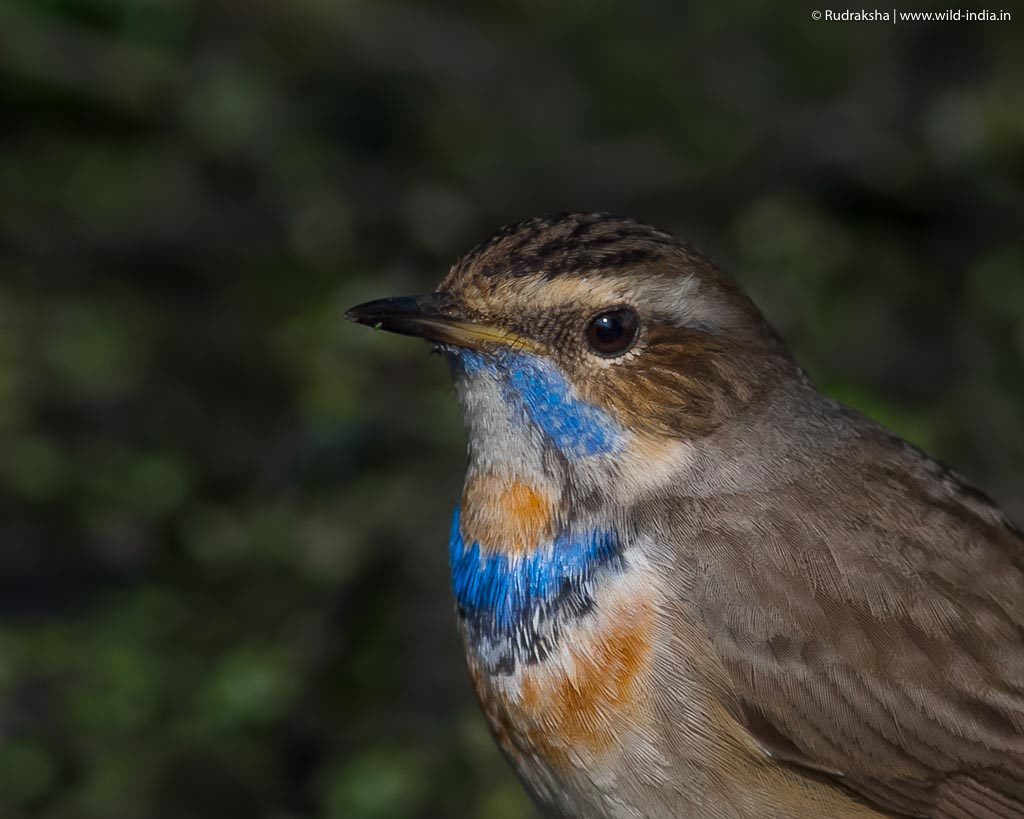
We spent rest of the the time at this place itself, watching the beautiful sunset. Some of the birds we saw here were Greylag Geese, Knob-billed Duck, Grey-headed Swamphen, Bronze-winged Jacana and the Bluethroat. While returning back, we were also greeted by a family of Golden Jackals.
We got back to resort by 18:30 hrs for snacks / tea and followed the rest of the evening in introductions, sharing wildlife experiences, making bird list, highlights of the day and finally winding up with dinner.
Day 2
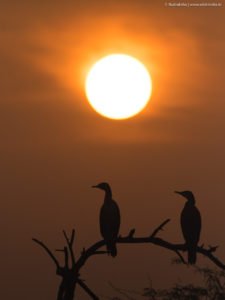
The second day of the tour started as early as 07:00 hrs as we made our entry into the park. The weather was chilly with temperatures around 8 degree celsius. We explored one of the trails were we came across two Great Cormorants perched on a dry branches against the beautiful sunrise – giving us ample opportunities to try out various exposure to make the classic silhouette images. We explored the other side of the trail where we came across waterfowls in big numbers. We also got to see the beautiful Black-necked stork on these trails and a Booted Eagle as well. We returned back to point where we saw the cormorant and this time we saw 5 Spotted Owlets perched close to eachother – indeed a lovely sight.
We explored the trees around this place were we saw Red-breasted Flycatcher, Grey-headed Canary Flycatcher and also a pair of Long-tailed Minivets. After spending around an hour, we made our way to the canteen in the park for breakfast. We also got to see a Hume’s Warbler, Lesser Whitethroat, White-cheeked Bulbuls, Shikra and a Golden Jackal crossing the road at this place.
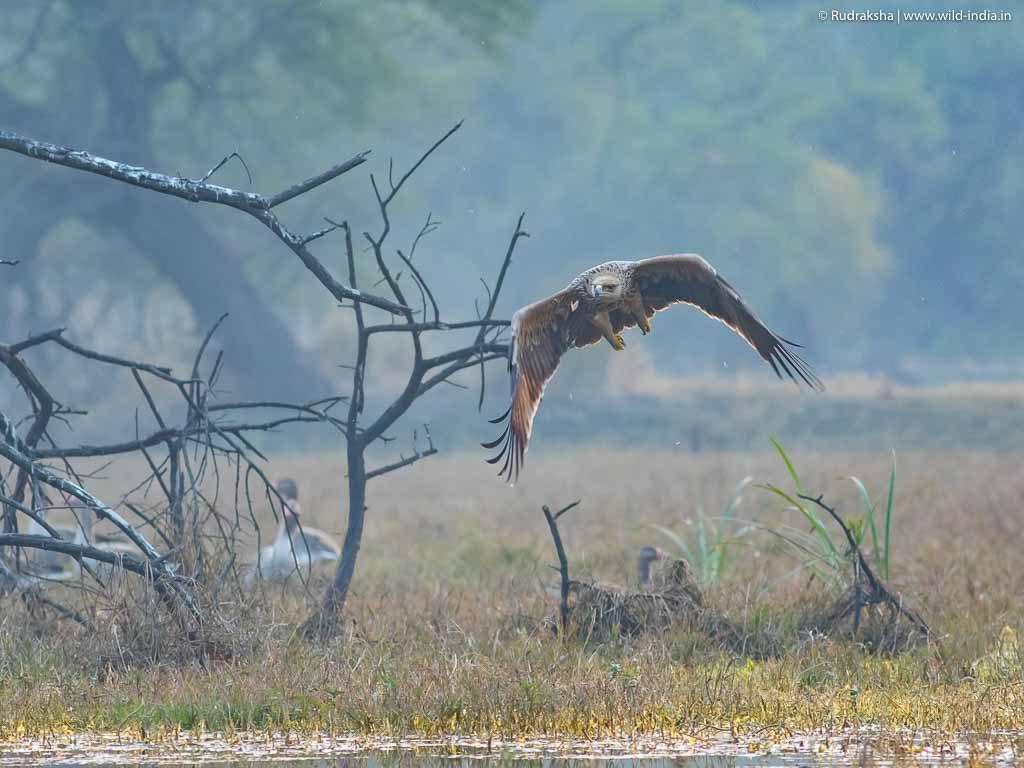
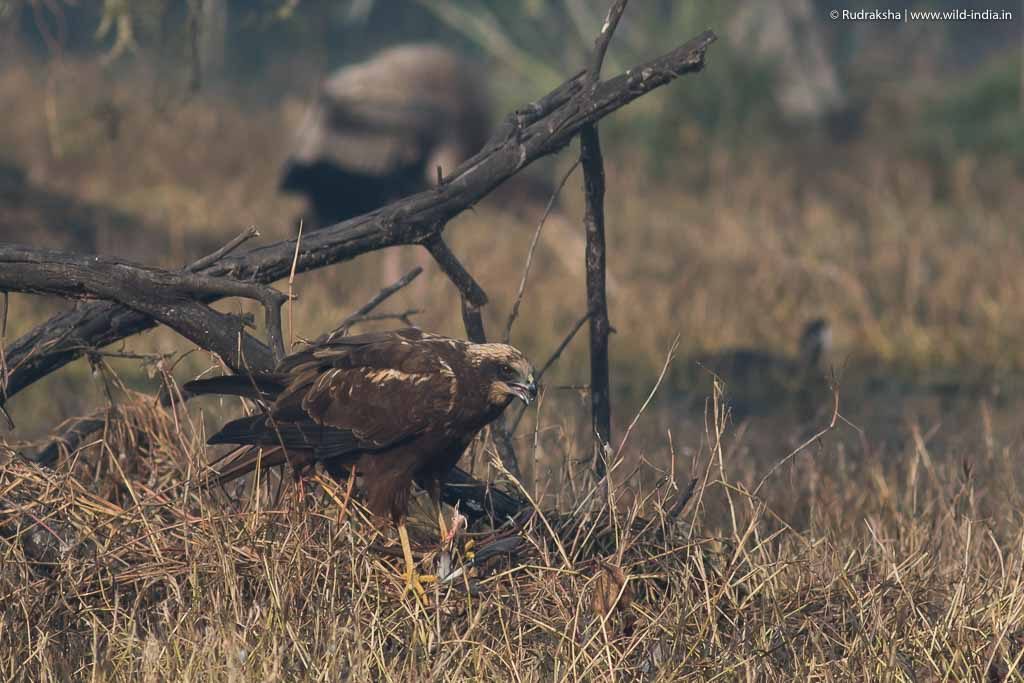
After breakfast, we kept exploring on the main tar road in the park as we came across a variety of species – a Collared Scops Owl pair, a Marsh Harrier busy hunting for a meal, Northern Shoveler, pair of Red-crested Pochards, Bonelli’s Eagle, Oriental Honey Buzzard, Greater Spotted Eagle, White-tailed Lapwings, two pairs of Ferruginous Ducks and numerous Bluethroats, Painted Storks, Great Cormorants, Purple Herons, Grey Herons, Little Grebes, Common Teals and Common Moorhens. Couple of members from our group also got to see and photograph the Great Cormorant hunting and feeding on a huge fish!
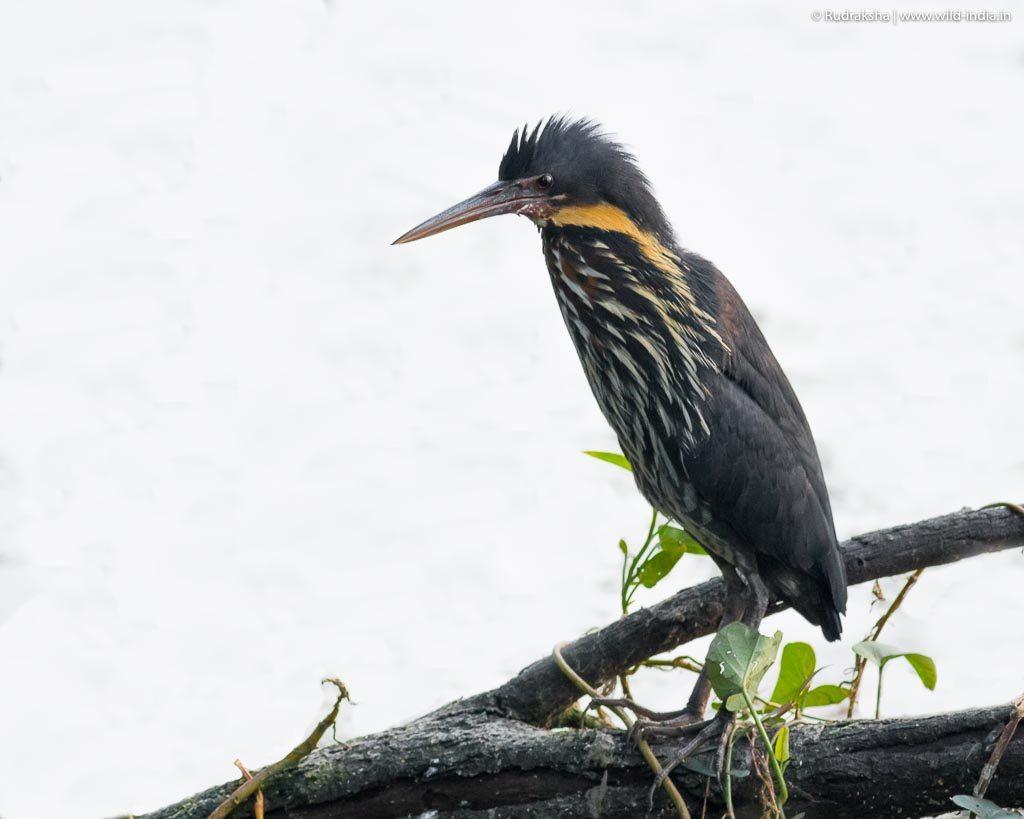
As we kept exploring, we sighted the shy Black Bittern in its typical habitat – completely camouflaged in a thick bush. A little ahead we also got to see the Yellow Bittern, this one was bold though as it was busy hunting in the open.
We did not realise as it was 14:30 hrs already. We proceeded for lunch in the canteen at the park. After lunch, we explored couple of trails near the park were we got decent views of the Dalmatian Pelicans, Cotton Pygmy Goose and a pair Dusky Eagle Owls. We also sighted three types of kingfishers – White-throated, Common and the Pied Kingfisher. After exploring for an hour or so, we made our way back to the sunset point. This time we sighted numerous raptors perched on the trees – Eastern Imperial Eagle, Greater Spotted Eagles (2) and Marsh Harriers. As the light was fading, We also got lucky to sight the shy Black Bitten in open for few seconds before it jumped back into the bush.
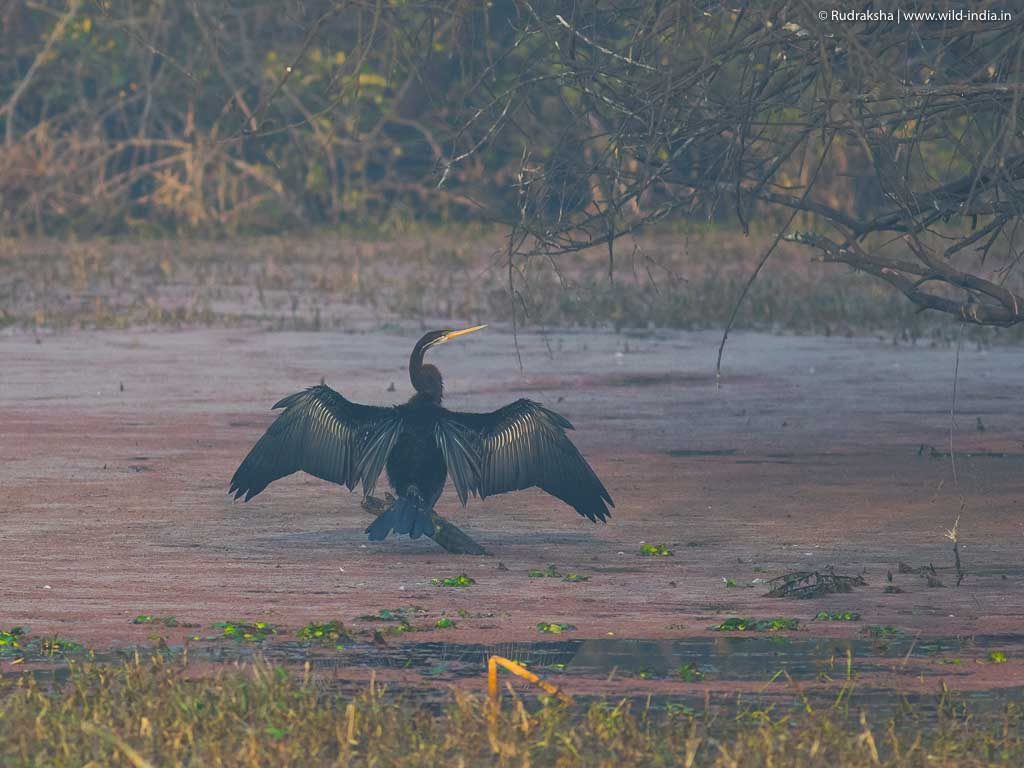
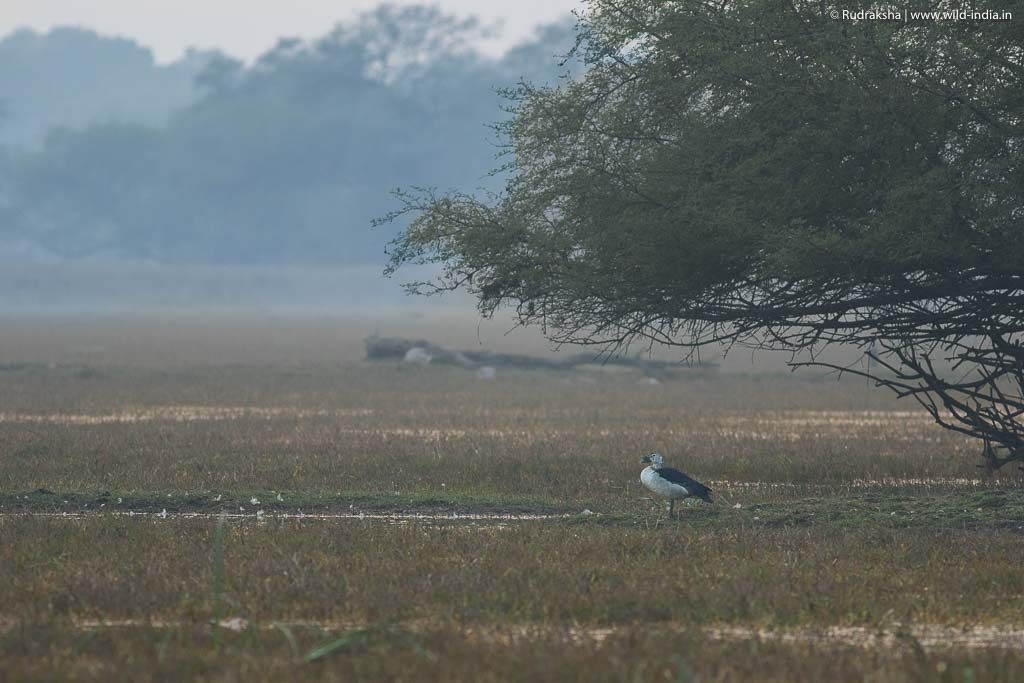
Other species seen were a group of Knob-billed Ducks, Grelag and Bar-headed Geese, Black-crowned Night Herons, Grey-headed Swamphens, Oriental Darter and numerous Bronze-winged Jacanas.
Soon the day ended and we were back to resort for yet another experience sharing session, reviewing images followed by dinner.
Day 3
As with Day 2, Day 3 started at 07:00 hrs. The weather was a little more foggy today as we made way into the park. We wanted to take a good chance of sighting the Sarus Cranes and getting better view of the Dalmatian Pelicans in this final morning session and hence we headed straight to the sunset point which has best chance of sightings. We saw couple of Pelicans in flight but couldn’t click them. We started exploring on of the trails a little ahead of the point and soon came across a pair of Sarus Cranes. It was a treat to watch them in the typical Bharatpur scape – standing tall in the long dry grass against bluish foggy background. After getting some decent clicks, we came across similar frames for Oriental Darter, Purple Heron and a Booted Eagle.
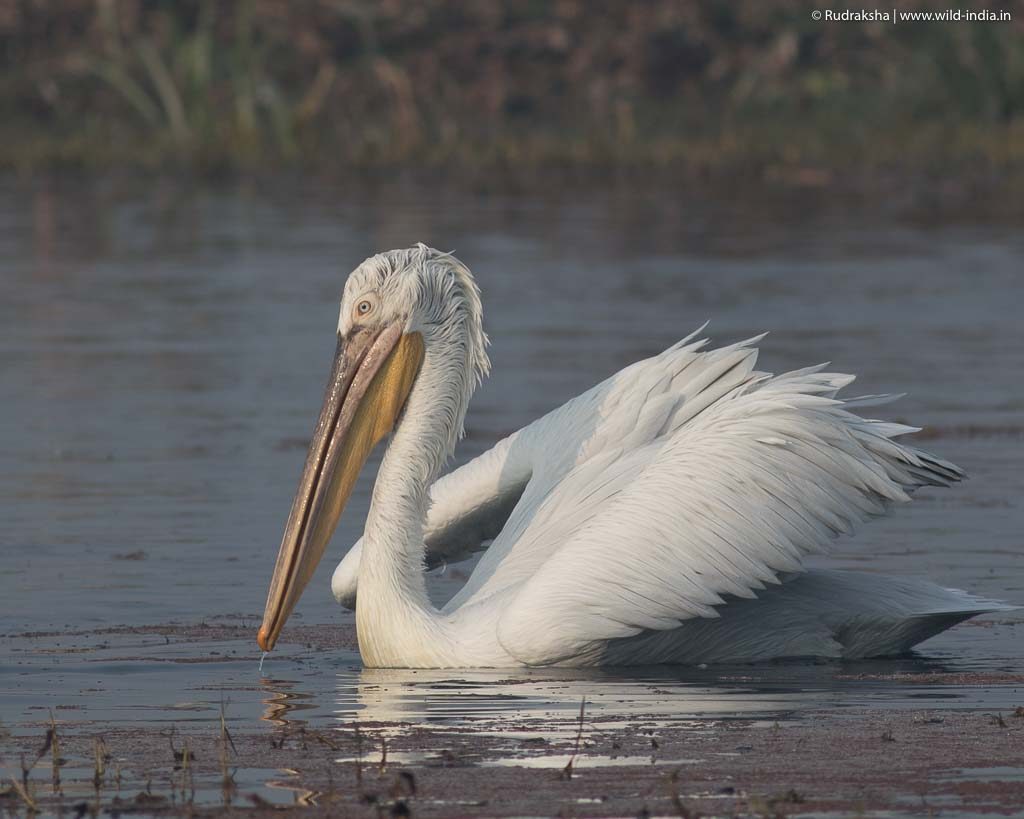
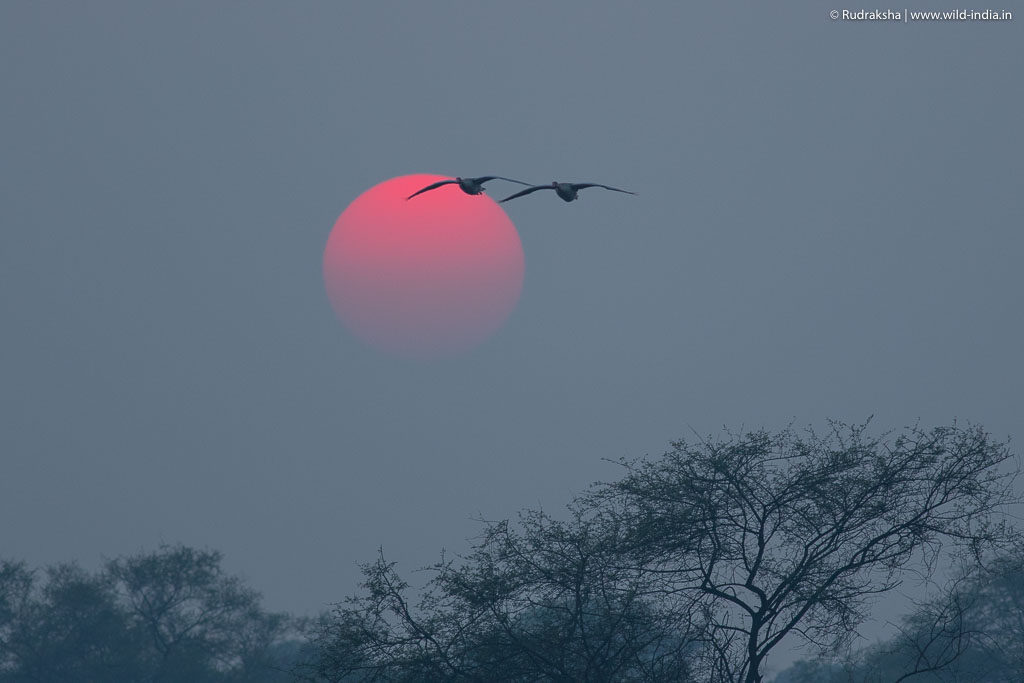
As we were returned back to the main road, we saw numerous groups of Great White Pelicans flying to other side of the trail. We went to explore and could see them in good number (over 50 individuals) feeding together. We missed making decent images as it was opposite light. Being content with the sighting, we started back to return to the main tar road in the park when we saw Marsh Harrier flying with a kill and to our luck, it perched right in-front of us and started feeding on its kill..!
Final hour of our session and we had to get back to resort to pack bags start our return journey. We were just exploring for Bitterns again when suddenly a pair of Dalmatian Pelicans came and landed in a water body next to sunset point and began feeding, only to be joined by around 6 more of them. As if a parting gift, we finally got to make some lovely images of this ‘Vulnerable’ species (as per IUCN v3.1). There wouldn’t have been a better end to the trip.
Clearly Keoladeo National Park at Bharatpur stands out as one of the best places to sighting a variety of bird species as well as to learn various aspects of wildlife photography – portraits, landscapes, silhouettes! you get a chance to try them all. Add to it delicious food and an amazing group, we just did not want to return.
That said, we have already planned to visit Bharatpur again in Jan-Feb 2018, this time a 4 Day trip. Stay tuned for the detailed itinerary and exact dates by subscribing to www.wild-india.in.
Thanks for viewing. Let us know in-case of any queries, suggestions, critics and we will be happy to respond.
In-case you have destination & dates in mind, write to us at info@wild-india.in and we shall design custom wildlife tour as per your requirements.
At Wild India Eco Tours, Chopta – Uttarakhand is one of our favourite bird-watching destinations and this tour in April 2016 as good at it gets. We sighted over 140 species of birds and got some mesmerising views of the the beautiful snow clad Himalayas. Key sightings from bird-watching perspective included the Pygmy Wren & Scaly-breasted Babblers, Chestnut-headed Tesia, Bearded Vulture, Red-billed Chough, Golden Bush Robin, Koklass Pheasant, Read More


 Splitting into groups of 2, we began our excursion on the cycle rickshaws. We came across various species of ducks – Common teals, Northern Pintails, Gadwalls, Little Grebes along with numerous Common Moorhens & White-breasted Waterhens. We also got some lovely views of the Oriental Scops Owl – camouflaged perfectly in a tree. Going ahead, we reached an opening were we got to see a pair of Bluebull walking across the wetlands.
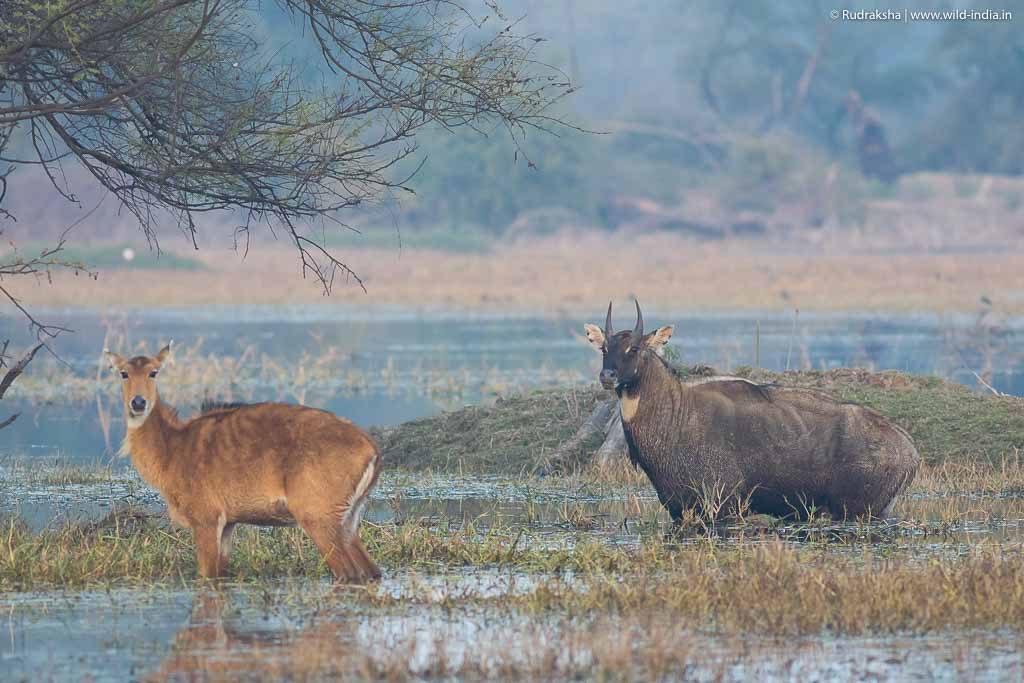
 The weather was chilly with temperatures around 8 degree celsius. We explored one of the trails were we came across two Great Cormorants perched on a dry branches against the beautiful sunrise – giving us ample opportunities to try out various exposure to make the classic silhouette images. We explored the other side of the trail where we came across waterfowls in big numbers. We also got to see the beautiful Black-necked stork on these trails and a Booted Eagle as well. We returned back to point where we saw the cormorant and this time we saw 5 Spotted Owlets perched close to eachother – indeed a lovely sight.
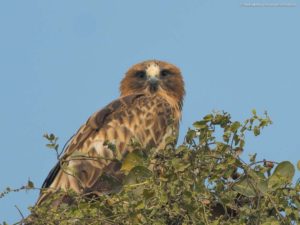
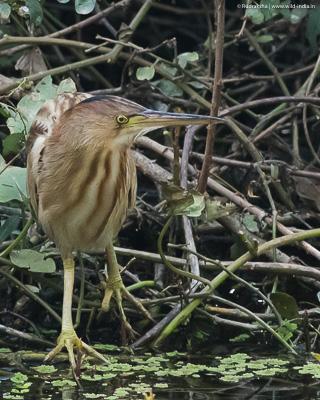 As we kept exploring, we sighted the shy Black Bittern in its typical habitat – completely camouflaged in a thick bush. A little ahead we also got to see the Yellow Bittern, this one was bold though as it was busy hunting in the open.